Tag: Ceiling Fan Box
Repairing a Ceiling Electrical Box
Dear Mr. Electrician: How do I go about repairing a ceiling electrical box? I removed the hanging ceiling light fixture in my kitchen and found that the ceiling light electrical box appears to be very loose. The box seems to be mounted on one side. Any suggestions?
Answer: There are a few tricks to repairing a ceiling electrical box. If it is a metal box, you may be able to strengthen its support by drilling a couple of screws through the side of the box and into the joist.
NOTE: Some text links below go to applicable products on Amazon. As an Amazon Associate, I earn from qualifying purchases. Using my links helps to keep this website FREE.
The electrical box may have been installed initially using nails into the side of the joist. They could have pulled out a little. I have encountered electrical boxes fastened to joists using only cable staples. Staples tend to pull out easier than nails.
If it is a metal or plastic electrical box attached to a metal bracket in-between joists, you may be able to tighten the center screw to tighten the box.
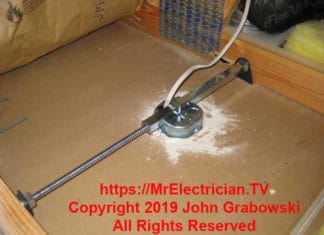
If it is still loose after that, the bracket may have come loose from the ceiling joists. In that case, you should follow my instructions below for installing a retrofit ceiling fan brace and box.
If the ceiling box is plastic, I would remove it and install a metal box. Non-metallic boxes can be made of different materials, such as PVC, fiberglass, or composite material. Fiberglass boxes can be broken apart, as can those made of composite material. PVC boxes do not break apart that easily unless they are old and brittle.
For a PVC side-mounted nail-on box, I start with a small pry bar or a large screwdriver and try to get behind the box to force it away from the wood joist. See below about labeling wires first before doing this.
At some point after prying, I take my Knipex 10" High Leverage Diagonal Pliers and nip away pieces of the box until I can get it out of the ceiling. Take good care of the wires when doing this.
REPAIRING A CEILING ELECTRICAL BOX THAT IS LOOSE
Turn the power off to this circuit. Remove the fixture mounting bracket by removing the 8-32 screws. Without disconnecting the wires that are inside the metal ceiling light electrical box, pull them down and away from the sides of the box.
Drill 2 or 3 holes using a 1/4" or 3/16" drill bit through the side of the box close to the ceiling joist. DO NOT drill into the joist. Screw some #10 or #12 long sheet metal screws with fender washers through the holes into the joist.
I'm not sure what screw length you will need, but you want to have at least 1" of the screw in the wood. Probably 1 1/2" or 2" screws would work. I recommend using hex head or Phillips pan head screws and a drill or impact driver to drive the screws in.
If the existing...
Installing a Ceiling Fan Using Existing Wiring
Dear Mr. Electrician: How do I install a ceiling fan using existing wiring to replace a light fixture in a house built in the 1970s? The fan would be mounted onto an existing ceiling light fixture box on the first floor.
Answer: To install a ceiling fan using existing wiring, removing the old ceiling light electrical box will most likely be necessary as it is not approved for ceiling fan support.
NOTE: Some text links below go to applicable products on Amazon. As an Amazon Associate, I earn from qualifying purchases. Using my links helps to keep this website FREE.
Read my article if you want to convert a switched outlet to control a ceiling fan.
Before working on the existing old wiring, shut off the circuit breaker for this particular lighting circuit.
Start the removal process by disconnecting and separating the wires and identifying them with colored electrical tape or numbers. This will help when you put them back together.
My Ceiling Fan Wiring Diagrams blog post will be helpful for you when trying to decipher the existing wiring.
REMOVE OLD ELECTRICAL BOX FOR CEILING FAN
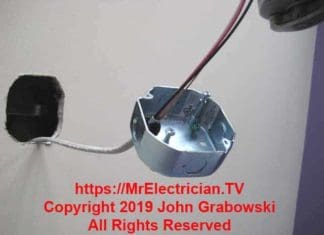
Loosen the screw for the wire clamp or unscrew the locknut on the cable connector. Remove the center screw(s) that holds the box to the support brace and carefully pull the box down while removing the wire from the box. Do not cut or damage the wires.
Removing the old ceiling box support bracket inside the ceiling can be difficult. I use my 24" bolt cutters to cut it in half. Then, I swing the cut pieces forth and back to see if they loosen from the ceiling. Most of the time, they are nailed in, and the longer the nail, the more difficulty there is in removing the bracket.
I have some mini pry bars for just such an occasion. I can get a short pry bar up in the ceiling, reach over, get it behind the nailed-in bracket, and give it a few tugs to get it loose enough for removal. Persistence is the key. If you get frustrated with the old box removal, take a short break and get right back at it.
CLICK HERE to See all of the Ceiling Fans That Amazon Sells
Top Of Page
Once the old box and support have been removed, you are free to install a new ceiling fan brace and fan-rated box as per article 314.27(2)(C) in the National Electrical Code (NFPA 70). Also, read article 422.18.
The new ceiling fan braces are relatively easy to install. The brace's ends are made to position the box at the correct height as they rest on top of the drywall ceiling.
Just line the brace up with the center of the hole and tighten it according to the manufacturer's instructions. The fan brace will expand as you turn it and bite into the joists. The brace should be straight and level as it goes from joist to joist and centered on the existing hole in the ceiling. If it's not straight and level, loosen and reposition the brace.
Confirm that...
Add Light Switch To Existing
Dear Mr. Electrician: How do I add a light switch to an existing switch? I want to change from a one-gang light switch to a two-gang. The existing one-gang wall switch controls an outlet. I want to install a ceiling fan and have two wall switches to control the ceiling fan and also the light on the fan separately.
Answer: It is possible to add a light switch to the existing one and change a one-gang switch to two-gang or more. However, much of what you need to do will depend on the type of structure you are working in and what room.
NOTE: Some text links below go to applicable products on Amazon. As an Amazon Associate, I earn from qualifying purchases. Using my links helps to keep this website FREE.
Table of Contents:
Before You Add A Light Switch To Existing
How To Remove The Existing Switch Box
How I Cut Access Holes
How I Installed A Ceiling Fan Box
How I Installed A Two-Gang Switch Box
A three-conductor cable with a ground wire must be installed from the ceiling fan to the wall switch location.
If you have an attic space above, adding a light switch to the existing electrical box can be done sometimes without damaging the walls. If you don't have attic access or if there are obstacles inside the wall or ceiling, you will need to cut holes in the wall and ceiling.
Another possibility is to use a surface mount raceway such as Wiremold. An example of Wiremold can be seen in this article of mine.
Below is an example of how I added a second switch to an existing one that controlled an outlet. This is from a ceiling fan installation I did a few years ago for some homeowners who bought a single-family detached house initially built in the 1960s.
BEFORE ADDING A SWITCH
When working in an occupied house, it is necessary to keep the work area clean so that dust and debris do not travel throughout the home. I use drop cloths to protect floors and carpets.
I use a cardboard box to catch dust and debris as it falls from the wall and ceiling. It also helps speed up the cleaning process at the end of the job.
I used a short piece of metal fish tape to probe the left side of the existing metal switch box to determine if any obstacles, such as air ducts or pipes, would prevent the installation of a larger switch box.
I also confirmed the function of each wire in the switch. I had a hot and a neutral, which were my main concerns.
The electrical outlet to the lower left of the wall switch was a split, half-switched outlet. To feed power to that outlet, a three-conductor cable was used. The switch controlled the red wire while the black had power at all times and continued that constant power to the other electrical receptacle outlets in the room.
Top Of Page
REMOVING THE EXISTING SWITCH BOX
The photo above shows three two-conductor cables...


