Dear Mr. Electrician: How do I install a ceiling fan using existing wiring to replace a light fixture in a house built in the 1970s? The fan would be mounted onto an existing ceiling light fixture box on the first floor.
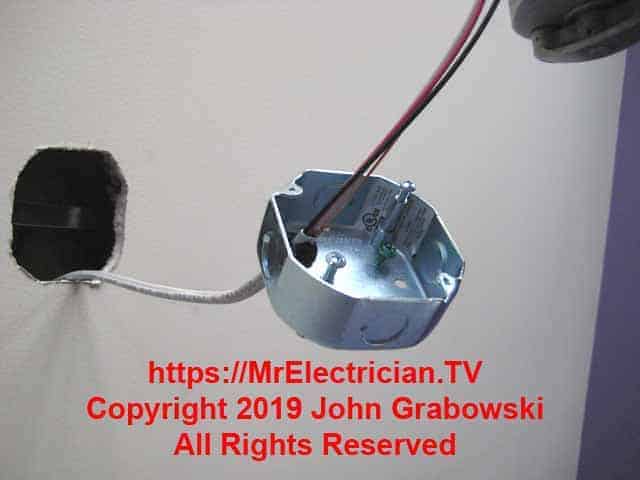
Answer: To install a ceiling fan using existing wiring, removing the old ceiling light electrical box will most likely be necessary as it is not approved for ceiling fan support.
NOTE: Some text links below go to applicable products on Amazon. As an Amazon Associate, I earn from qualifying purchases. Using my links helps to keep this website FREE.
Read my article if you want to convert a switched outlet to control a ceiling fan.
Before working on the existing old wiring, shut off the circuit breaker for this particular lighting circuit.
Start the removal process by disconnecting and separating the wires and identifying them with colored electrical tape or numbers. This will help when you put them back together.
My Ceiling Fan Wiring Diagrams blog post will be helpful for you when trying to decipher the existing wiring.
REMOVE OLD ELECTRICAL BOX FOR CEILING FAN
Loosen the screw for the wire clamp or unscrew the locknut on the cable connector. Remove the center screw(s) that holds the box to the support brace and carefully pull the box down while removing the wire from the box. Do not cut or damage the wires.
Removing the old ceiling box support bracket inside the ceiling can be difficult. I use my 24″ bolt cutters to cut it in half. Then, I swing the cut pieces forth and back to see if they loosen from the ceiling. Most of the time, they are nailed in, and the longer the nail, the more difficulty there is in removing the bracket.
I have some mini pry bars for just such an occasion. I can get a short pry bar up in the ceiling, reach over, get it behind the nailed-in bracket, and give it a few tugs to get it loose enough for removal. Persistence is the key. If you get frustrated with the old box removal, take a short break and get right back at it.
CLICK HERE to See all of the Ceiling Fans That Amazon Sells
Once the old box and support have been removed, you are free to install a new ceiling fan brace and fan-rated box as per article 314.27(2)(C) in the National Electrical Code (NFPA 70). Also, read article 422.18.
The new ceiling fan braces are relatively easy to install. The brace’s ends are made to position the box at the correct height as they rest on top of the drywall ceiling.
Just line the brace up with the center of the hole and tighten it according to the manufacturer’s instructions. The fan brace will expand as you turn it and bite into the joists. The brace should be straight and level as it goes from joist to joist and centered on the existing hole in the ceiling. If it’s not straight and level, loosen and reposition the brace.
Confirm that the fan brace is solid by giving it a firm tug. Bring the wire into the fan box using a cable connector or clamp before attaching the box to the fan brace.
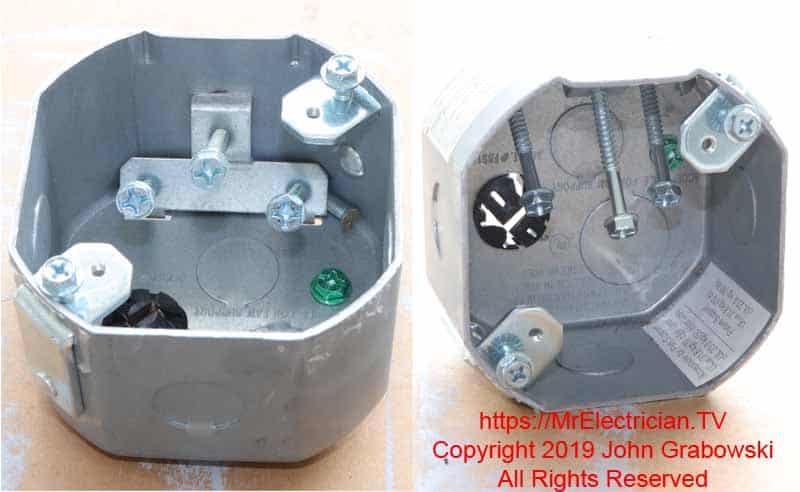
The fan box in the photo above attaches directly to the side of a joist. It can be installed during new construction or retrofitted many years after a home has been built.
Occasionally, I have a ceiling fan installation that is not so typical and requires some thought and ingenuity to get a ceiling fan box installed. One of the most common out-of-the-ordinary installations is when double drywall is used on the ceiling. Other times, I encounter resilient channels. This keeps the electrical box recessed back too far into the ceiling.
My simple fix is to buy a regular fan brace kit and a separate 2-1/8″ deep fan box instead of the 1 1/2″ box that usually comes with the fan brace. It is possible to buy a fan brace with a deep box. However, the legs on the brace are longer, so the deep box will not sit lower.
I have heard other electricians cutting the legs to bring the box down. That works as long as the fan brace can lock into the ceiling joists.
INSTALL A CEILING FAN USING OLD WIRING
Ceiling fan manufacturers usually furnish installation instructions. Many have simplified the process by adding a hook or hole to hold the fan motor up on the ceiling while you splice the wires together. Ceiling fan installations vary slightly by manufacturer, even from low-end to high-end models within the same brand.
CLICK HERE to see a variety of ceiling fan-rated electrical boxes.
If installing a ceiling fan is new to you, I suggest you read the instructions and plan how the ceiling fan needs to be assembled on a table or floor. Do not try to fully assemble the fan and mount it on the ceiling as a whole unit.
Start by grounding the new fan box with the existing bare or green ground wire and a green grounding screw. Leave a grounding pigtail long enough to extend past the box a few inches. If needed, splice pigtails onto the existing wires to extend them a few inches beyond the ceiling fan box.
Next, mount the bracket that came with the fan onto the ceiling fan electrical box using the screws and hardware with the fan brace and box kit. With the canopy and extension pipe attached, hang the fan motor from the hook or tab on the fan bracket. Make the electrical connections.

If installing a remote control, insert the receiver module into the bracket. This is usually a tight fit, and the wires get in the way. Tuck the electrical wires inside the fan box if possible. Tuck the wires in so they don’t protrude from the canopy, then mount it. It is okay if the wires are inside the fan canopy. The fan motor should now hang freely with the canopy closed.
Many fan blades come with rubber grommets that must be inserted into the holes on each blade. The blades must be installed for some fans before the light kit can be mounted. I use a screw-holding type of screwdriver that holds the screws as I install each fan blade. Some fan blades are made to snap into place without screws.
The light kit is usually attached by plugging it into a modular plug inside the bottom of the fan. Then the light canopy is attached using three small screws.
Here’s the link to all of my ceiling fan blog posts, some of which you will find helpful for your particular ceiling fan installation.
To help keep this website FREE, please use this Amazon link for your purchases. As an Amazon Associate, I earn from qualifying purchases.
Click for a FREE copy of my book “Almost Everything You Need To Know To Repair a Bathroom Exhaust Fan In Your Home.”
Get your required “Emergency Disconnect, Service Disconnect” labels and stickers to satisfy the 2023 National Electrical Code requirements in article 230.85(E)(1) and (2) by going to my Redbubble Shop here.
Visit my Link Tree home page for my social media connections and other links.
