
Dear Mr. Electrician: How do I fix my in-ground swimming pool bonding wire?
Answer: Although swimming pool bonding wire is not difficult to fix if you know the National Electrical Code requirements. It is best left to professionals due to the high risk of injury or death if done improperly. Below are photos of a commercial pool bonding that I repaired.
NOTE: Some text links below go to applicable products on Amazon. As an Amazon Associate, I earn from qualifying purchases. Using my links helps to keep this website FREE.
Article 680.26 Equipotential Bonding in the National Electrical Code determines swimming pool bonding methods needed for each pool.
Bonding of swimming pools, hot tubs, and other immersion pools is essential to reduce electrical shock hazards and the possibility of electrocution.
Water and electricity are not a safe combination, so the electrical installation must be done according to the National Electrical Code and local code requirements.
Below are photos of a commercial pool that failed inspection due to equipment bonding shortcomings.
In my state, commercial swimming pools must be inspected by a licensed electrical contractor every few years. The required inspection is a good thing because every time I have done a pool inspection, I have found problems. Most problems were not from the original swimming pool construction but due to repairs, changes, and a lack of good preventative maintenance.
Unfortunately, the state has no such inspection requirements for homeowner-managed swimming pools. Consequently, problems on residential homeowner pools are not caught unless someone working on the pool notices something is wrong or if someone gets hurt or dies.
BONDING WIRE REPAIR

This is a close-up shot of the same pool pump from the top of this page. Although it does have a bonding wire connected, the lug is not approved for two wires, only one. The photo below depicts my correction with a new lay-in lug and crimped wires.

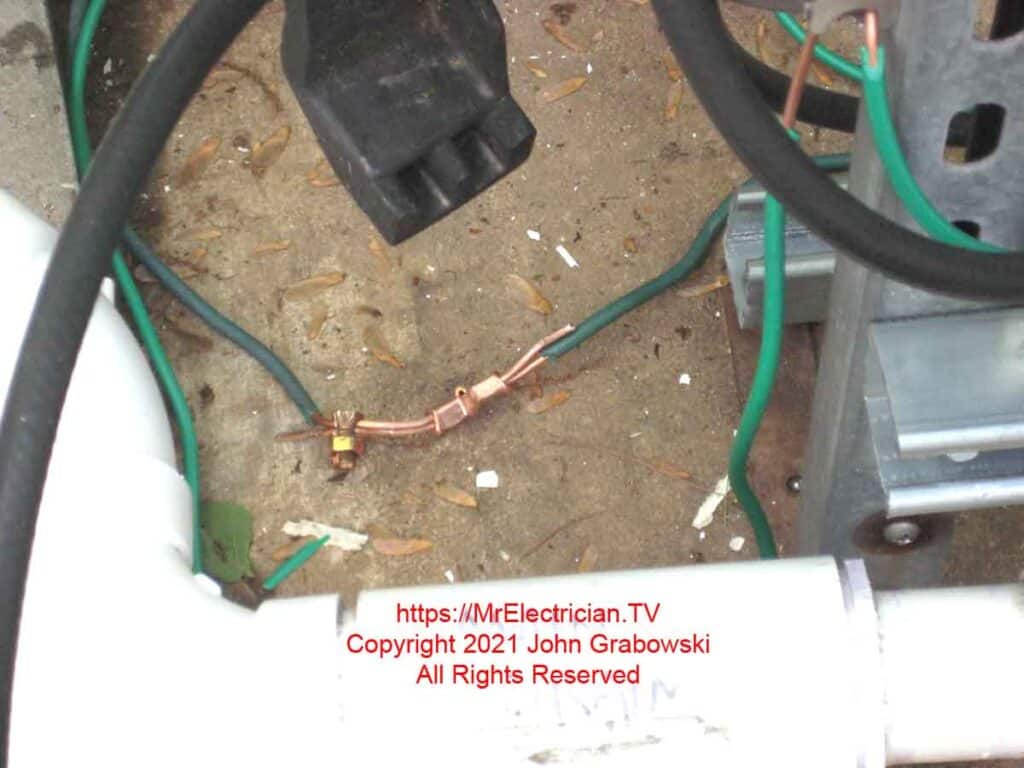
A new tin-plated copper lay-in lug was installed, and the broken bonding wire was spliced together using a copper C tap and a crimping tool. I also used a copper split bolt connector to remove the crimps’ strain.

The swimming pool pump motor above has its own built-in lay-in lug and set screw.

Lay-in lugs are favorable for use on pool equipment because they make it easy to replace the equipment without removing all the bonding connections. The bonding wire should never be cut.

A pool heater with a lay-in lug and number 8 solid copper wire. All equipment associated with a pool must be bonded.

The above swimming pool lighting transformers were all required to be bonded. One of the bonding lugs had two wires in it. That would have been okay if the lug was approved for two wires, but it wasn’t.

Two wires in a pool equipment bonding lug that was not approved for two wires. My fix is below.

I pulled the extra wire out of the lug and made a splice using a copper crimp and a copper split bolt connector.

I used a copper C tap crimp and a copper split bolt connector to join the wires for a low-resistance connection.

The original installer installed a bonding lug on the top of the outdoor wiring trough. It would have been better if the lug was on the bottom to keep water out, but there was probably no room to get an electric drill underneath after the lighting transformers were installed.

Using only copper split bolt connectors for the #8 solid copper pool wire is acceptable. Crimped connections are not required for pool bonding.

The strut risers that support the pool controls were only fastened to the concrete slab with some L brackets. Consequently, the pool controls were shaky, and the upright strut could be easily swayed.

Due to the proximity of the service door on the pool heater, I could not install some larger brackets for support. I rigged some Unistrut and strut fittings onto the existing concrete bolts and strut, making the pool controls more secure.

I drilled and tapped holes in the strut and used stainless steel 10/32 screws with nuts to attach the lay-in lugs to the strut.
I spliced some #8 copper wire onto the existing #8 bonding wire to extend the bond to the pool control support posts. Insulated or bare wire is acceptable for pool bonding but must be #8 solid copper wire. Do not use stranded wire for pool or hot tub bonding.

OTHER POOL BONDING REQUIREMENTS
In addition to the above, the pool bond wire must be connected to the pool deck perimeter, usually by connecting to the wire mesh or rebar in the concrete using rebar ground clamps. Even without concrete, a bond wire is required in the pool deck perimeter.
All metal handrails, ladders, water spouts, diving boards, water slides, pool lighting, underwater audio equipment, pool cover motor, and the pool shell with rebar must also be connected to the solid copper #8 continuous swimming pool bond wire. Anything metal within three feet from the inside wall of the pool must be bonded to the same #8 wire.
According to article 680.26(C), the pool’s water must also be bonded. This is accomplished by installing one or more special water-bonding fittings designed for that purpose. The fittings can be placed on the pool pump water pipes, in the skimmer, or by other means.
Electrocution in a pool is a very real occurrence, so it is important to get the electrical installation correct. There is a device that monitors pools for electric shock. Although it has been promoted as a great way of monitoring for stray swimming pool electrical currents, the reviews indicate a high failure rate after a short time. You can see it here on Amazon.
For all of my other grounding and bonding topics, click here.
Visit this website article for a lot more details about swimming pool bonding.
To help keep this website FREE, please use this Amazon link for your purchases. As an Amazon Associate, I earn from qualifying purchases.
Click for a FREE copy of my book “Almost Everything You Need To Know To Repair a Bathroom Exhaust Fan In Your Home.”
Visit my Link Tree for social, stickers, and merchandise links.
Click here to get a link to a FREE online, viewing-only version of the National Electrical Code.


