Dear Mr. Electrician: How do I determine if I need an attic fan replacement?
Answer: You may not need a complete attic fan replacement. It is often just a matter of replacing the fan thermostat, the attic fan motor, or sometimes both.
NOTE: Some text links below go to applicable products on Amazon and eBay. As an Amazon Associate, I earn from qualifying purchases. Using my links helps to keep this website FREE.
Table of Contents:
A simple test to determine if a complete attic fan replacement is needed is to disconnect the thermostat and then hard wire the fan motor directly to the power source. If the motor works fine like that, a new thermostat is needed. If the motor doesn’t work, hums, or makes noise, you need a new attic fan motor.
I have repaired and installed several attic fans as an electrician. Although the work is pretty straightforward, it becomes challenging, given the working conditions. A complete attic fan replacement is rarely needed.
Replacing the roof-mounted attic fan motor involves climbing up in an attic with tools, safety gear, parts, water, and lighting. Sometimes, I have had to put plywood on the ceiling joists and bring a ladder into the attic to reach the fan motor comfortably enough to work on it.
Sometimes, I had to do this twice, once to diagnose the problem with the fan and get the model number and the second time to replace the attic fan motor. Attic fan motors are proprietary and are not interchangeable, even though many look alike.
It is essential to get the correct model number of the fan before searching for attic fan replacement parts. The model number on the fan motor can help track down a replacement, but having the original fan manufacturer’s name and model number is the best.
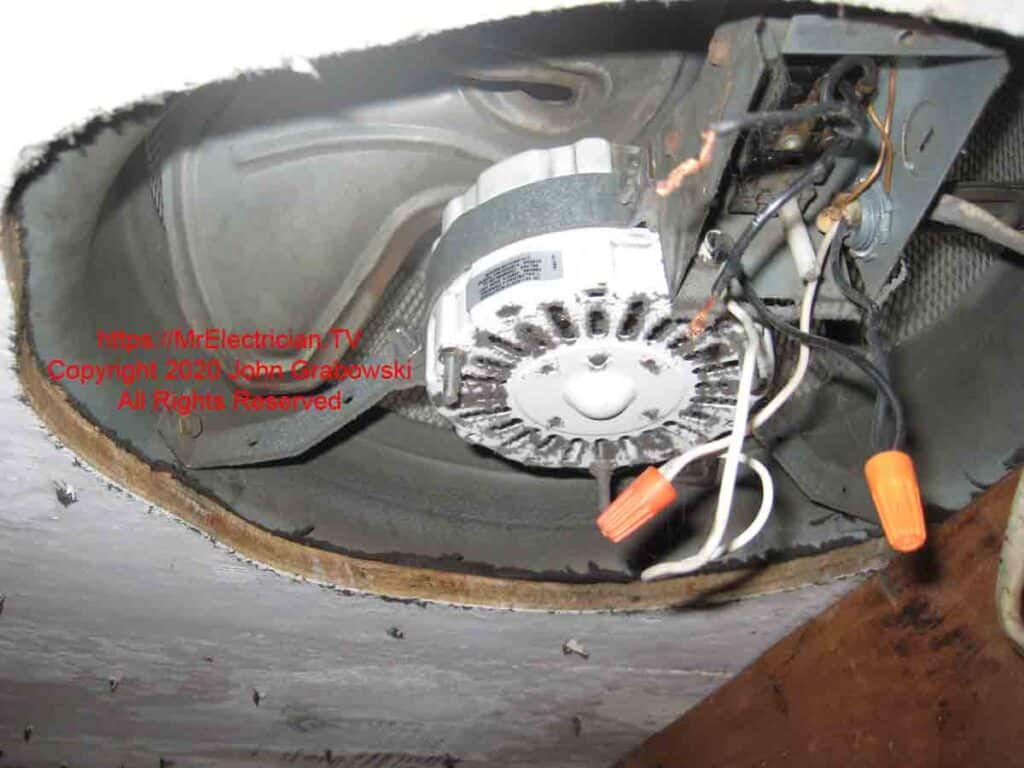
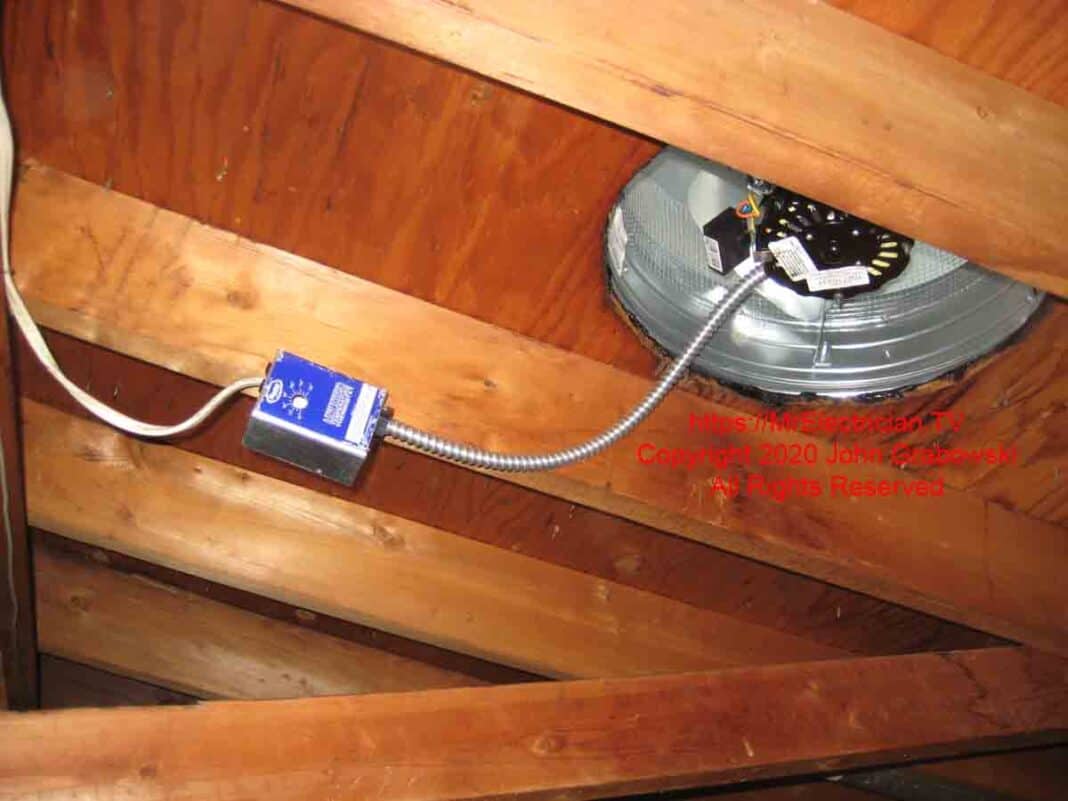
The fan motor above had bad bearings and made a loud noise when turned on. I disconnected the thermostat and wired the motor directly to test the motor. This fan accumulated dust because the dryer vent duct up to the roof leaked air, and the fan sucked up the dust. The dust inhibits airflow through the motor for cooling purposes. The motor could overheat and fail prematurely.
The fan model above has its thermostat mounted directly on the fan. Other brands have the thermostat a short distance from the fan blades.
CLICK HERE to See Attic Fan Motors On eBay
HOW I REPLACE AN ATTIC FAN MOTOR
It begins with my work pants that have built-in kneepads and side pouches. I also have a dust mask or a respirator to wear. Sometimes, I wear my hard hat, but it can be inhibiting, depending on the working conditions. Work gloves are also essential to keep from getting splinters when grabbing onto wood beams. I wear a headlight; if there is no other light, I will bring a work light and cord up there.
Though it may be summer and hot in the attic, I always wear lightweight, long-sleeved work shirts. Insulation on the skin is not pleasant.
To help cool the attic while I am working up there, I open a few windows in the home. The open attic hatch allows natural air to flow upwards through the attic. It does make a noticeable difference when working up there. I also bring my water bottle with me.
As mentioned previously, accessing the attic fan motor can be a challenge. In addition, working on the fan requires some tools that not everyone has in their toolbox. I had to buy some unique but not unusual tools to work on attic fans. I already owned 3/8″ and 1/4″ drive ratchet wrenches but needed additional extensions and flexible joints. I also had to buy several sizes of Allen Wrenches that would attach to my ratchet wrenches.
I put all the tools I needed into a five-gallon bucket to make it easier to carry into the attic.
If there isn’t a disconnecting switch in the attic, I have to shut the power off at the circuit breaker after I locate the correct one. Then, I disconnect the wiring from the fan motor and the thermostat.
I loosen the three bolts on the round clamp holding the motor. Depending on my body positioning to the fan (Usually awkward), I will use some wrenches or the 3/8″ ratchet with a socket.
I used to try to remove the fan blade first so it would be easier to drop the motor, but it tends to be frozen on the motor shaft. Now, I remove the motor with the fan blade attached as it is easier to work on it on the ground. Have some penetrating oil for that. The fan blade is held in place on the motor shaft by an Allen screw. Every fan blade has a different size Allen screw.
Next, I will remove two or all three bolts and nuts and separate the brackets. This allows the fan motor to drop down, but not to the floor, because the fan blade gets caught on the brackets. The fan blade has to be wrangled around the brackets without damaging the blade. A bent blade could cause the fan motor to wobble, making noise and shortening the life of the motor bearings.
I will transfer the fan blade to the new motor with the old motor on the ground. I will also do whatever motor wiring I can while it is down.
Installation is pretty much the reverse of the above, with care taken not to bend the fan blade. Once the motor is bolted, I will work backward to the thermostat and the disconnecting switch to get them as they should be.
Some thermostats have a test button to test the motor if the temperature is not hot enough. Most of the time, I can lower the thermostat setting all the way down to activate the motor.
HOW I WIRE A FAN
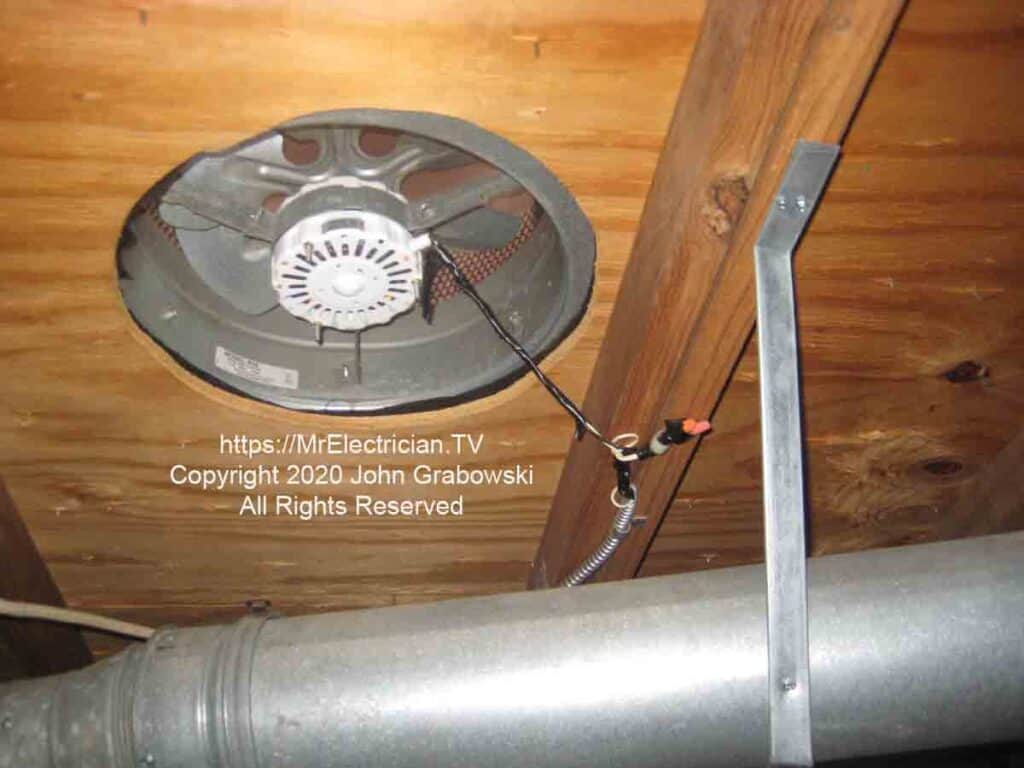
On a routine call to replace some smoke alarms in the attic, I discovered the above wiring mess on a running attic fan. I showed the homeowners my pictures, and they authorized me to make repairs. Notice the manufacturer’s label on the fan housing. That is important when needing the model number for an attic fan replacement part.
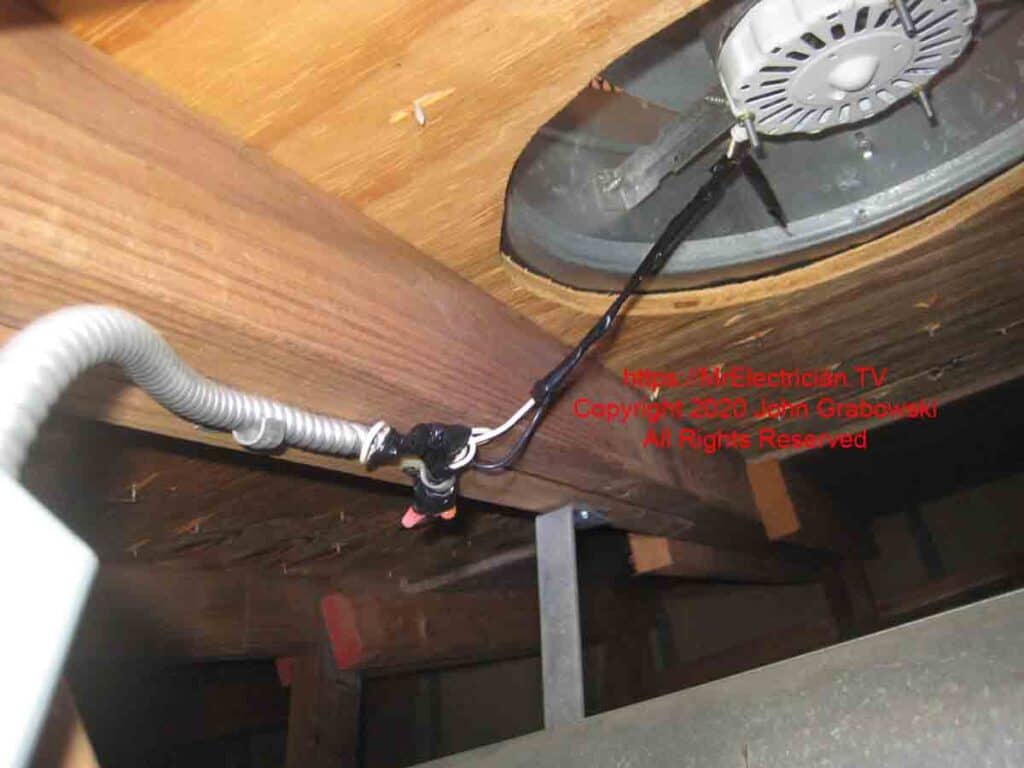
Fortunately, an attic fan replacement motor was not needed in this case; only a wiring repair was required. The 3/8″ flexible metal conduit must be screwed onto the nub where the wires exit the fan. This ensures ground continuity. The leads on the motor are usually long enough.
A 3/8″ flexible metal conduit can usually be purchased at an electrical supply company. Some of them will cut it by the foot.
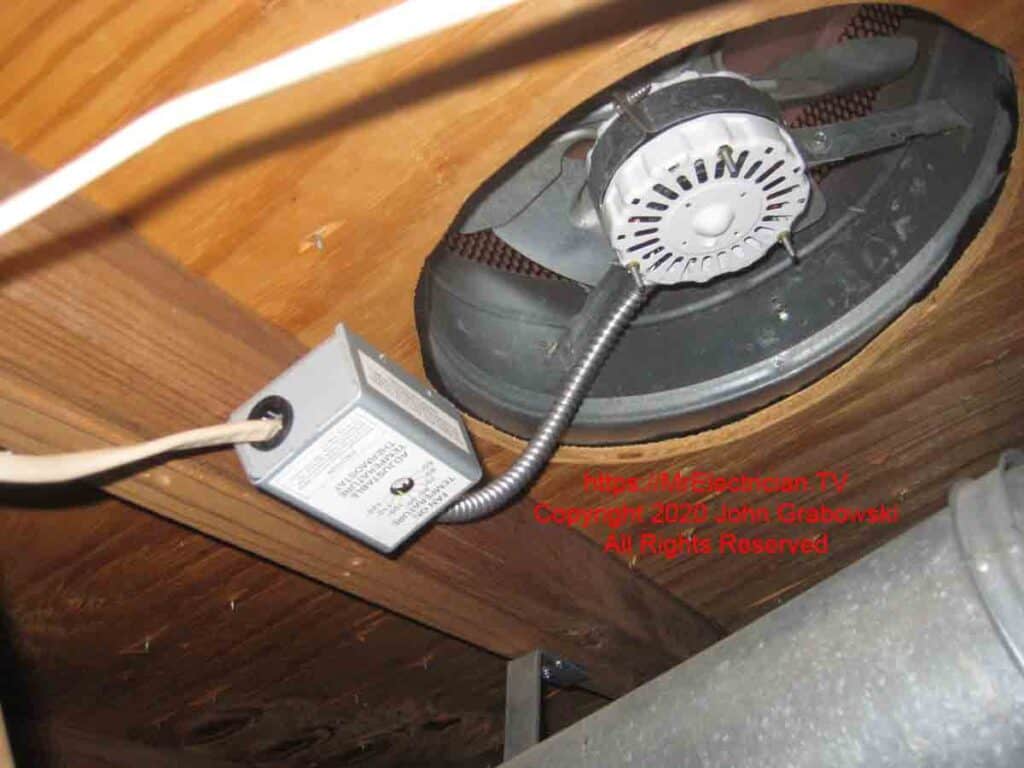
Attic fan thermostats are much easier to find than motors. Attic fan thermostats are less proprietary and usually interchangeable, except for the fan models where they are directly attached to the motor.
The Home Depot stocks an attic fan replacement thermostat that will work on several models of attic fans. They also stock one brand of attic fan replacement motors. Please do not buy their attic fan motor replacement unless you are sure it is the correct model.
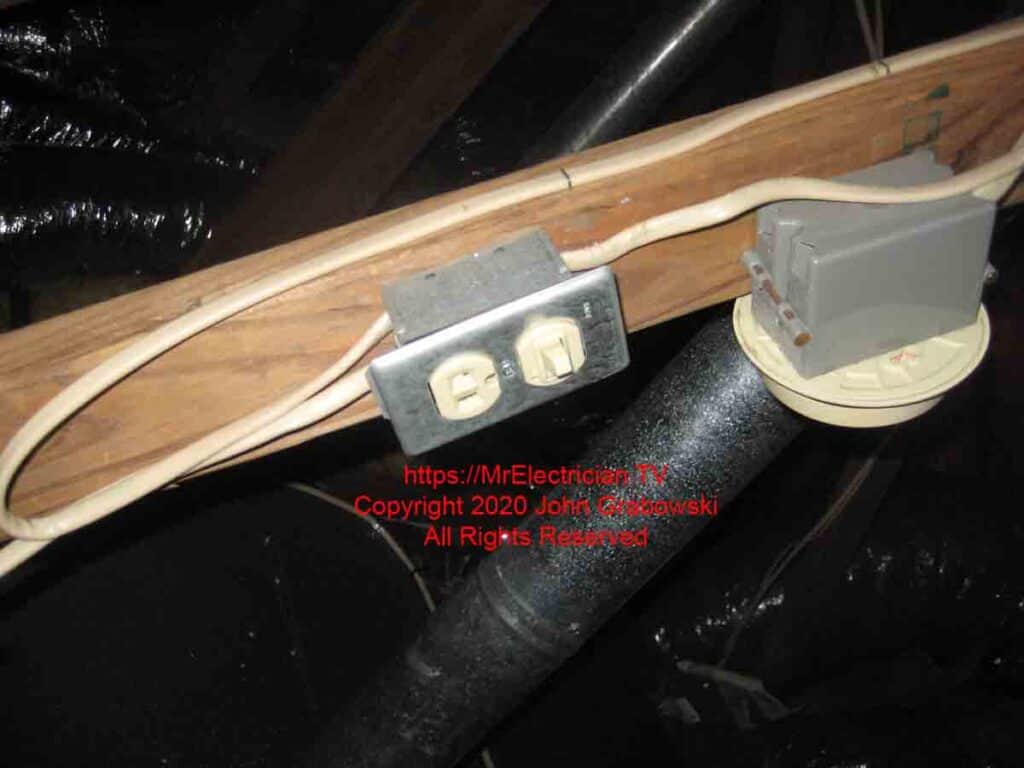
The combination device above was the shut-off switch for the same attic fan with the wiring mess. This was in a condominium attic, which also contained the forced air furnace, which is why there was a smoke alarm up there. The working conditions were quite cramped.
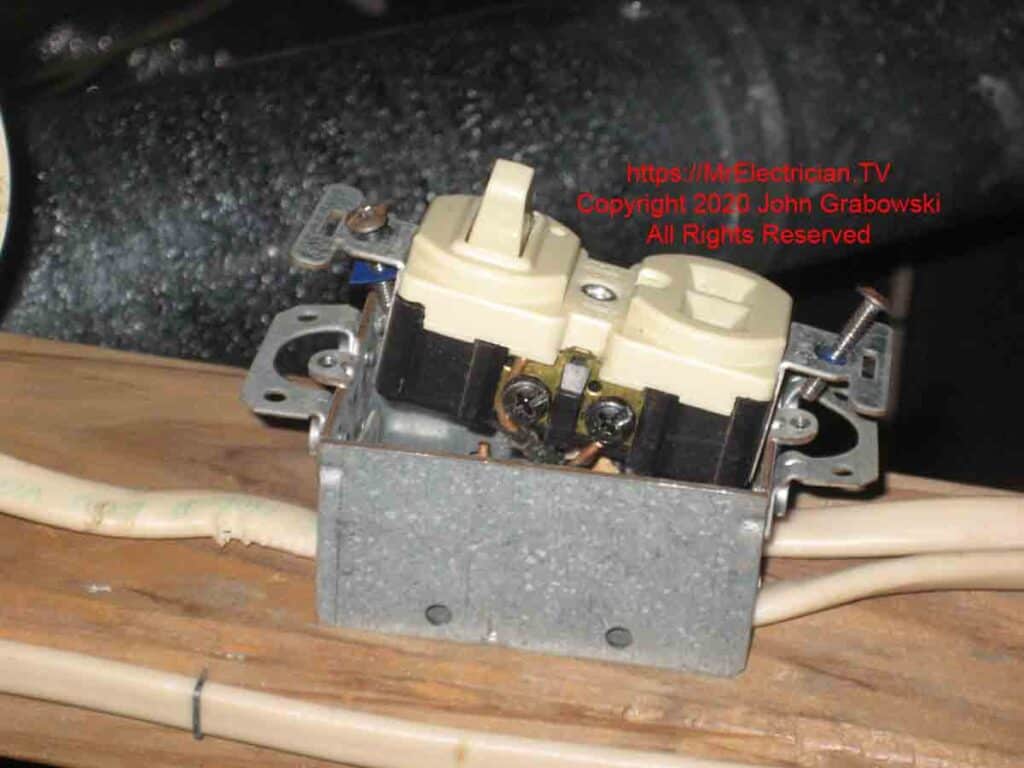
From how this fan was wired, it was clear that someone did it without much electrical wiring experience.
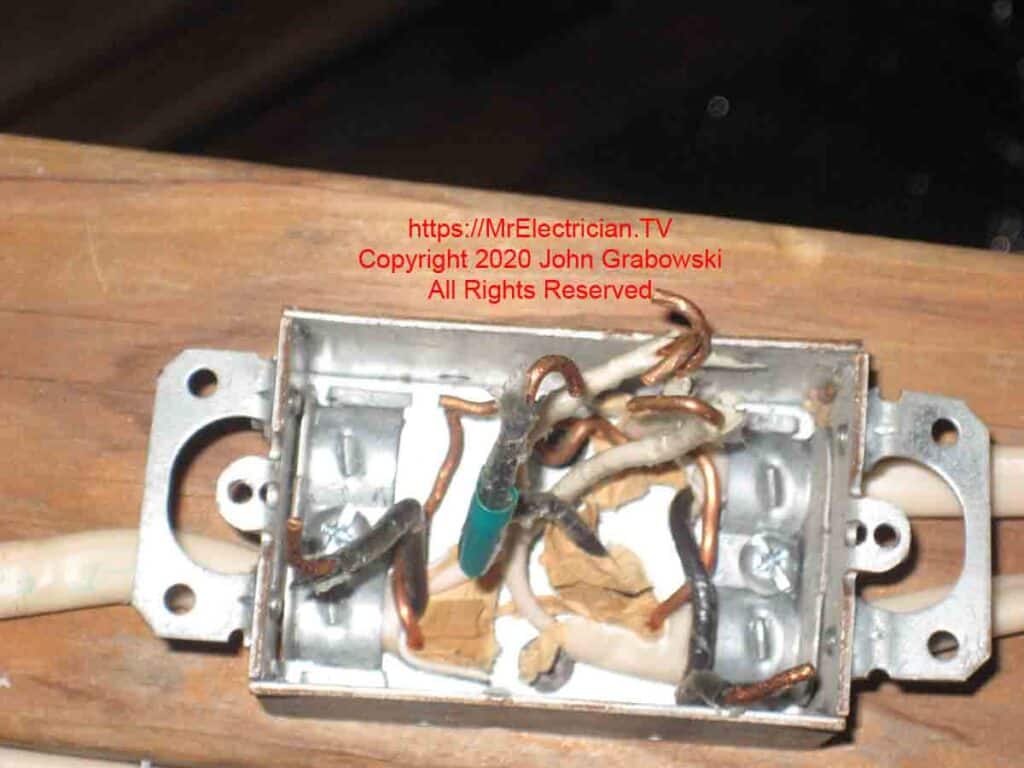
The metal switch box was overloaded with wires and violated the National Electrical Code. The cable clamps in the box each count as one wire when determining cubic inch capacity. Each wiring device, such as a switch or an outlet, counts as two wires. For more information on cubic inch requirements, see article 314.16.
Although grounding conductors were inside the box, none was bonded to the metal box. If the insulation on one of the current-carrying wires were damaged and came in contact with the metal box, it would energize the box but not cause the circuit breaker to trip off. All metal must be grounded.
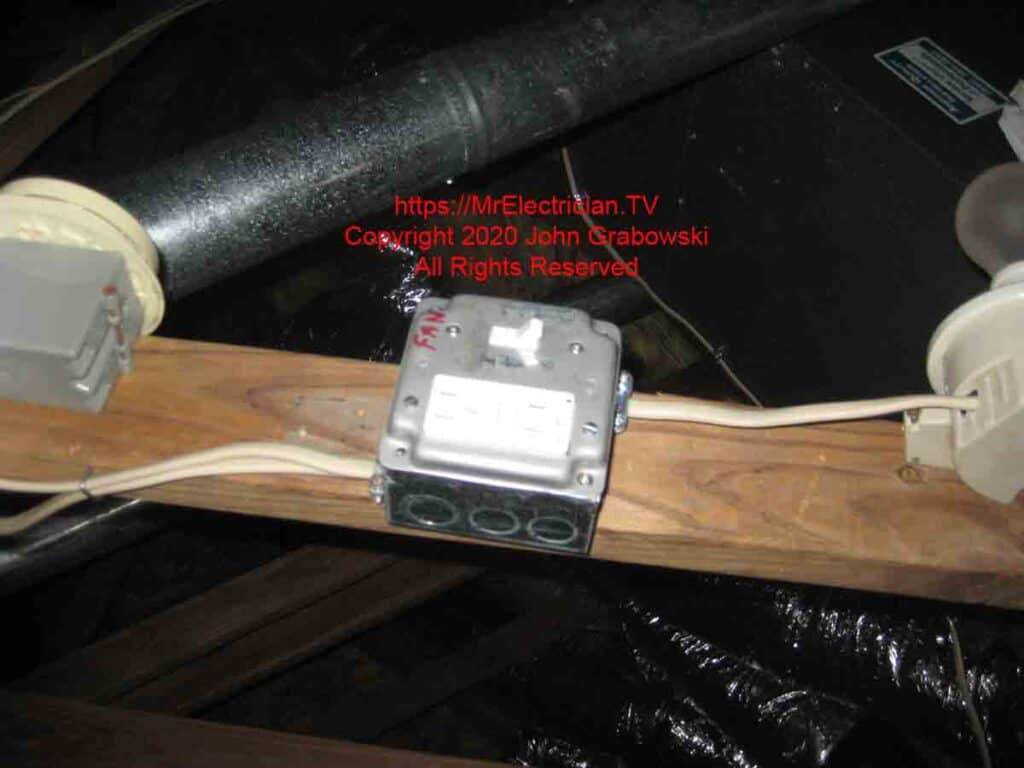
A disconnect switch is required within sight of the attic fan for servicing.
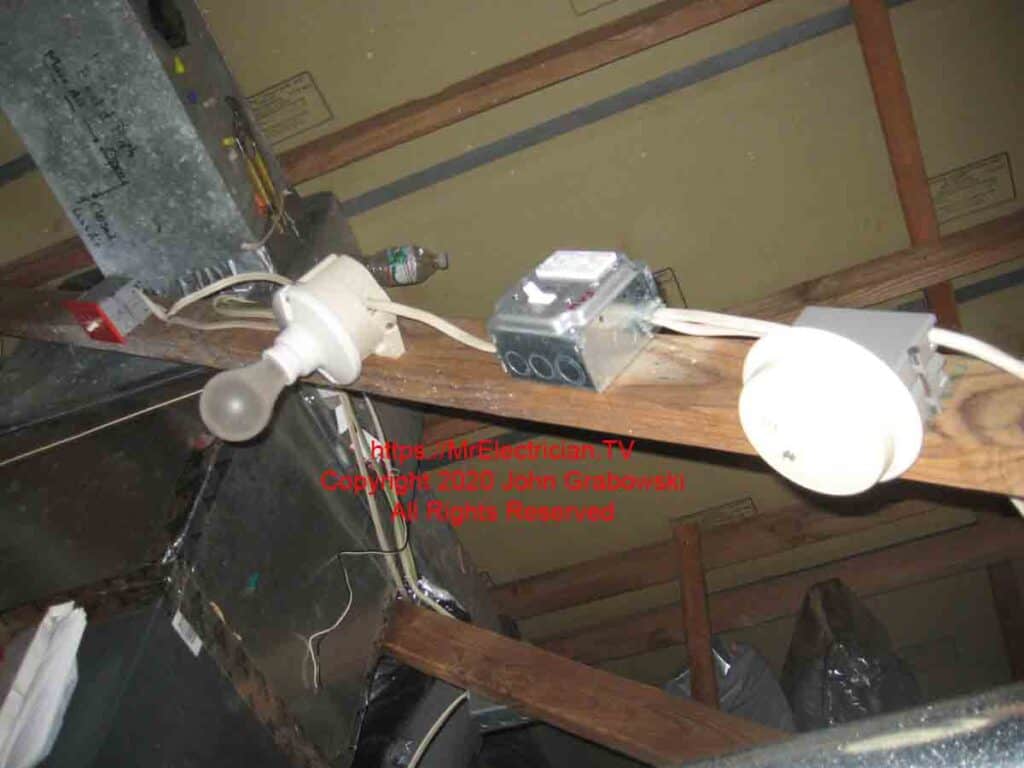
A GFCI electrical receptacle is required in this location to serve the attic-installed furnace.
FAN REPLACEMENT
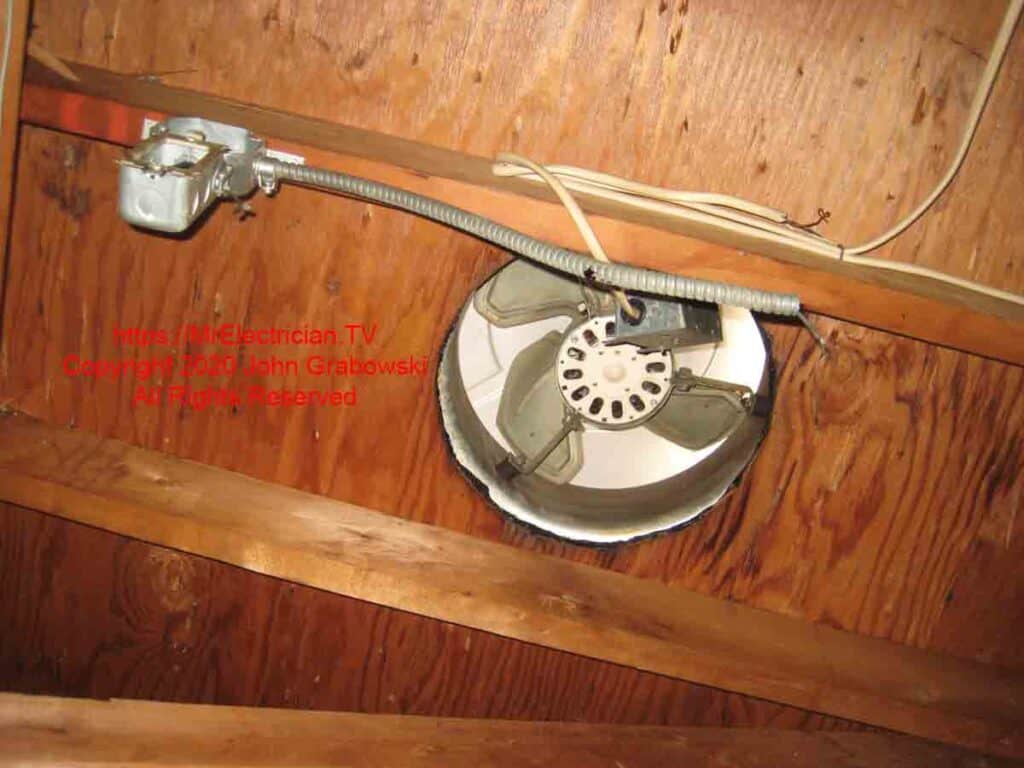
The above attic fan came up in a home inspection report on a house being sold. The homeowners needed to get it fixed right. I could not locate an attic fan replacement motor for this unit. I contacted a motor repair shop to see if they could repair the old motor. The motor shop told me that these motors are proprietary and their parts are not universally compatible. They suggested bringing the old motor to them to see if they could match it up with something.
I spoke with the homeowners about the problem of finding the correct attic fan replacement motor. They said to go ahead and replace the entire fan unit.
I ordered a new attic fan and hired a roofer to install the fan on the roof since he was better equipped. The roof was old, and if any damage to the roof shingles occurred, I would not be able to make roof repairs.
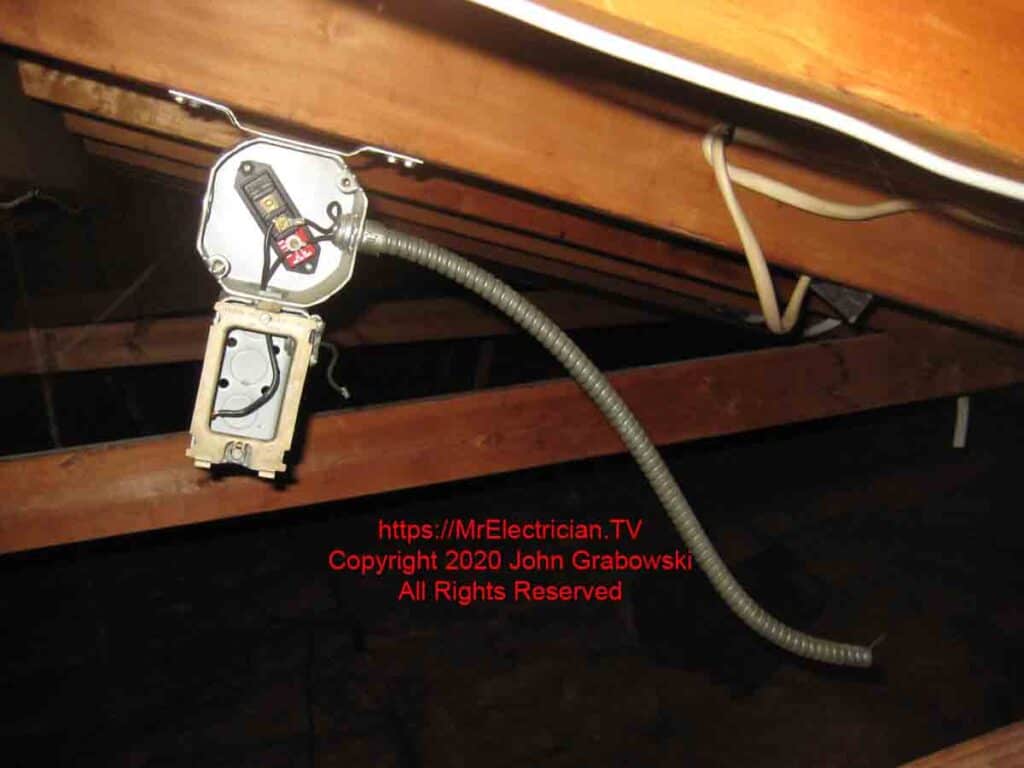
The electrical box above contained the thermostat for the old fan motor. First time I saw a setup like this.
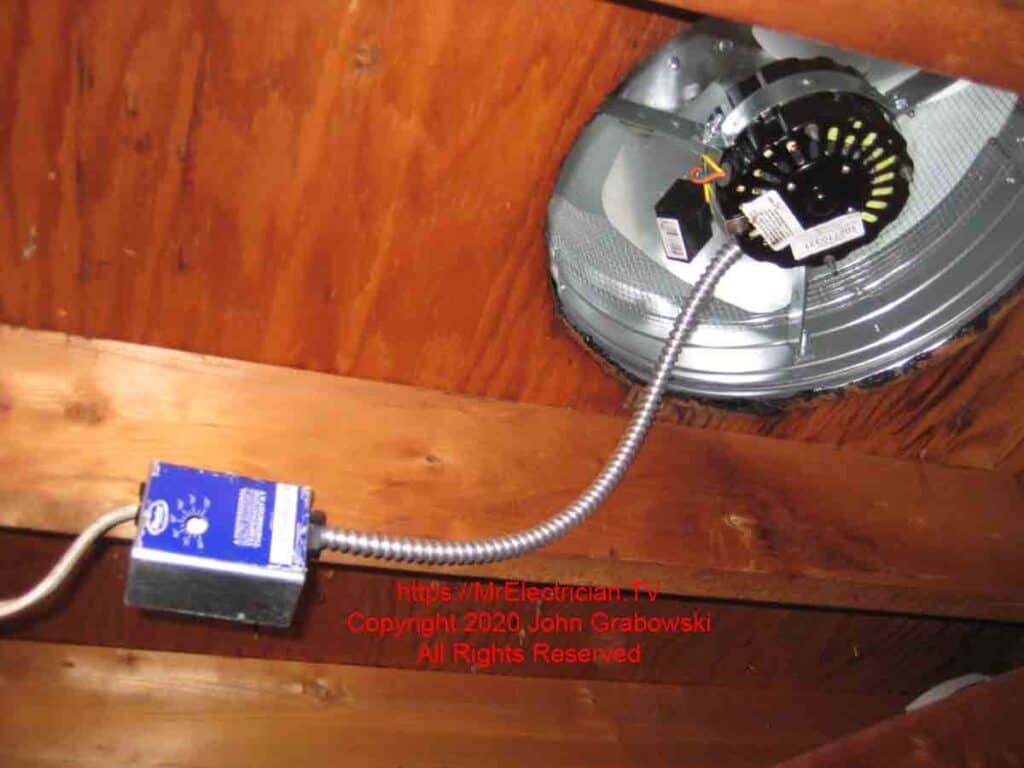
Above is the new attic fan replacement unit and remote thermostat. I let the thermostat hang below the roof joist to better sense the air temperature. I usually set the thermostat to 120 degrees. From my experience with attic fans, I found that at 120, the fan will run all day but not all night. Of course, this will vary by region.
CLICK HERE to See Attic Fan Thermostats on Amazon
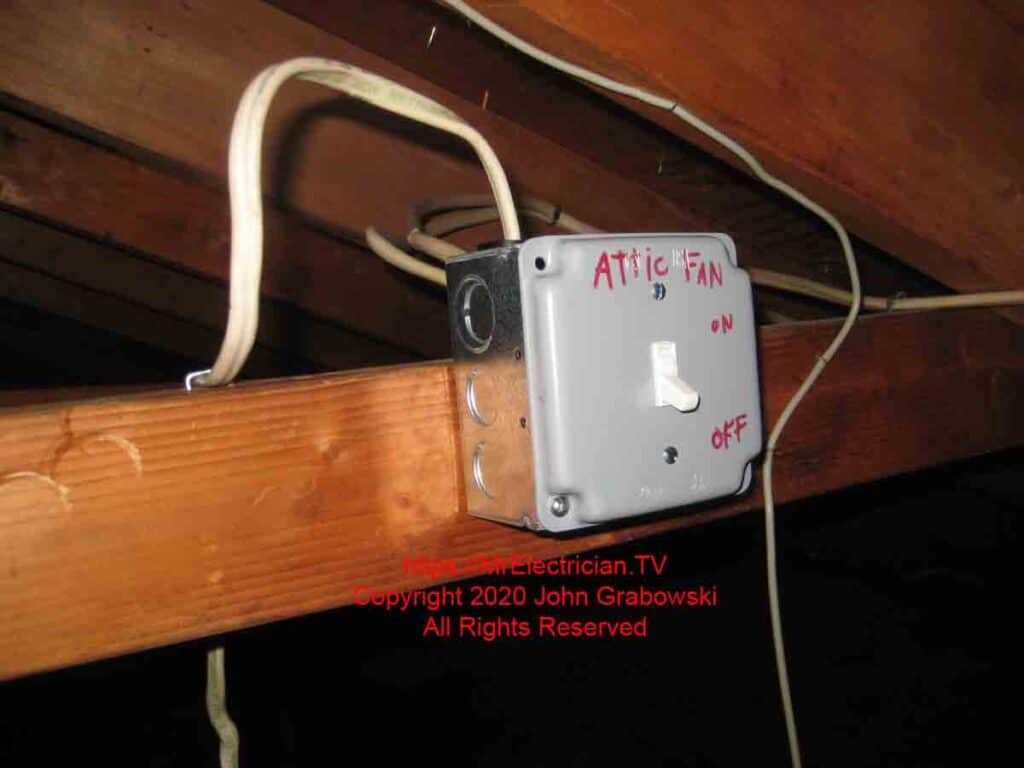
I also installed a disconnect switch for the new fan. I forgot my P Touch label maker that day.

The tools that I usually have on hand for attic fan replacement or servicing consist of my lineman pliers, screwdrivers, adjustable wrench, Allen wrenches, 1/4″ drive socket wrench with extension bars and a universal joint, and 1/4″ drive deep and short 6-point sockets, 3/8″ socket wrench with extensions bars, universal joint, and 3/8″ deep and shallow 6 point sockets. I also have small hex-bit Allen Wrench Sockets for the Socket Wrenches to loosen the set screw on the fan blade.
I will have wire connectors, electrical tape, and any hardware I think I might need in my pouches. I must also carry the new motor, new thermostat, and any electrical required materials, such as wire, cable connectors, and electrical boxes, into the attic.
My post with light switch wiring diagrams may be helpful to you. Just substitute the fan motor for a light fixture. The wiring is the same.
To help keep this website FREE, please use this Amazon link for your purchases. As an Amazon Associate, I earn from qualifying purchases.
Click for a FREE copy of my book “Almost Everything You Need To Know To Repair a Bathroom Exhaust Fan In Your Home.”
Get your required “Emergency Disconnect, Service Disconnect” labels and stickers to satisfy the 2023 National Electrical Code requirements in article 230.85(E)(1) and (2) by going to my Redbubble Shop here.
Visit my Link Tree home page for my social media connections and other links.
