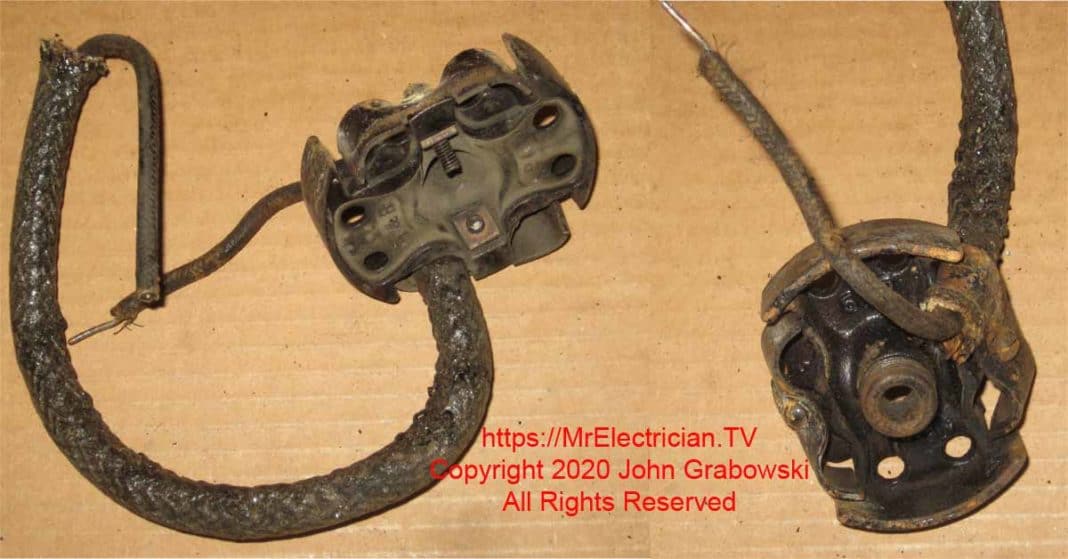
Dear Mr. Electrician: Should I replace old ceiling pancake box with a new ceiling light fixture installation? After removing the existing light fixture canopy cover, I found that there isn’t a standard ceiling electrical junction box. Instead, there is a black round disc (about 3 inches in diameter) with a 1-inch long screw-type rod sticking out. The wires are around it. This is incompatible with the new light fixture I want to install. What do I do?
Answer: The best thing to do is replace old ceiling pancake box. However, sometimes that is more trouble than it is worth. Below are photos and old pancake box situations that I have come across.
NOTE: Some text links below go to applicable products on Amazon. As an Amazon Associate, I earn from qualifying purchases. Using my links below to make any Amazon purchases helps keep this website FREE.
I suspect that the round disc is an old black enameled metal pancake box. It’s approximately the diameter and thickness of a hockey puck.
Table of Contents:
- Enameled Ceiling Pancake Box
- Replacement of Old Style Pancake Box
- Photos of Website Visitor Pancake boxes
Sometimes an old gas pipe protrudes from the middle of this pancake box instead of a fixture stud. A set screw tightens the box to the gas pipe.
WHAT IS AN ENAMELED CEILING PANCAKE BOX?
That was how old houses that originally had gas lighting were converted over to electric lighting. The pancake box was mounted onto an existing disconnected gas pipe. The cables were attached to the pancake box, and splices were made. An additional fitting, such as a 3/8″ x 1/8″ hickey was threaded onto the gas pipe to support the light fixture which was made for this type of installation.
You can see an example of a gas pipe protruding from a ceiling below.
The canopy of the old-style ceiling light fixture acted as the junction box for the spliced wires. When calculating box fill for the maximum number of wires allowed, you can include the identified cubic inch capacity of the light fixture canopy according to article 314.16(A) in the National Electrical Code.
On very rare occasions, I have found that the gas pipes were still connected to the main gas line after I removed an old light fixture or the cap on the gas pipe, so proceed with caution as you replace old ceiling pancake box.
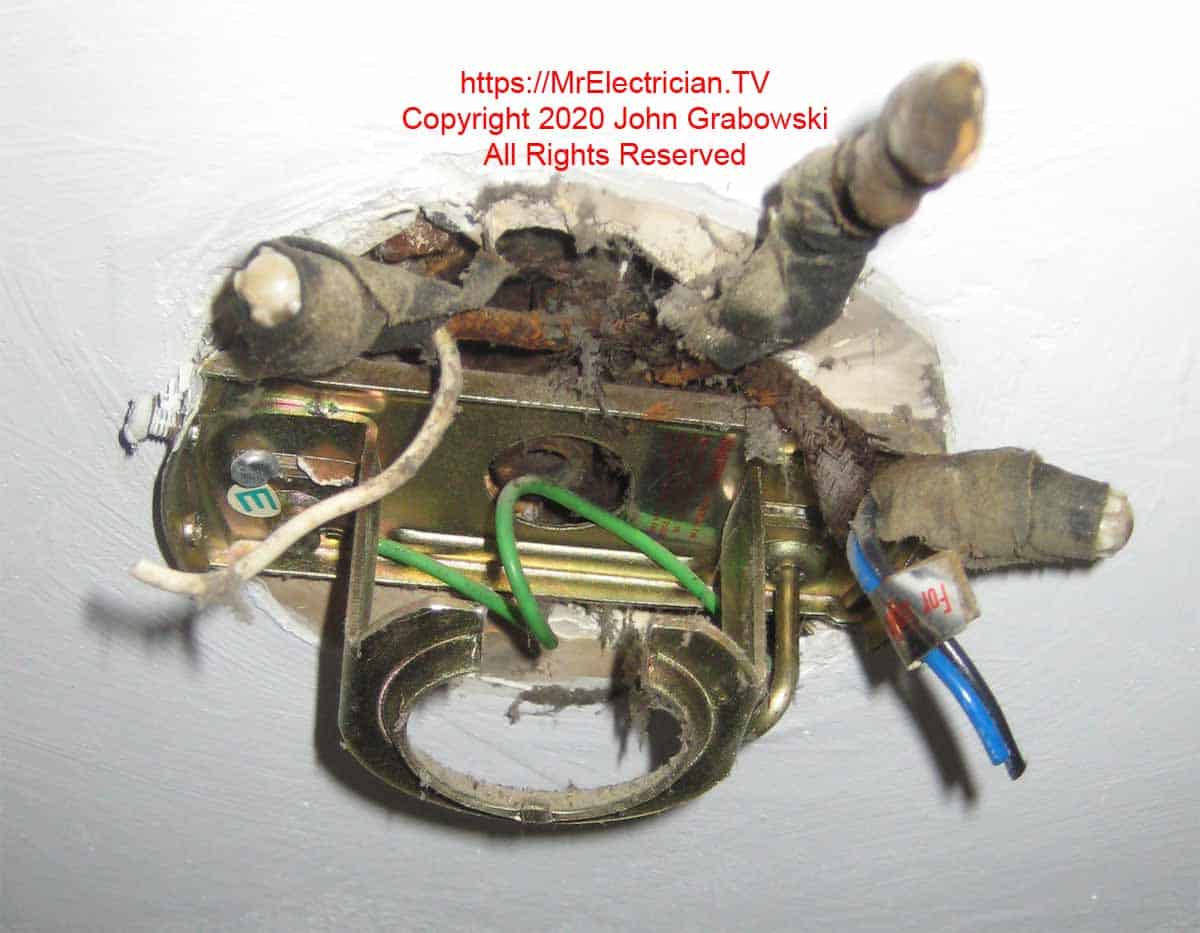
I got a call to install a new light fixture. The above photo was what I found when I arrived. The fan bracket was screwed to the ceiling independently using long sheet metal screws driven into the wood joist. The remains of the cut old ceiling fan wires protruded down.
CLICK HERE To See Old Work Ceiling Fan Electrical Boxes on Amazon
Other old pancake boxes were mounted directly onto ceiling joists using wood screws. Instead of an opening for a gas pipe, they would have a built-in fixture stud for attaching a light fixture. The fixture stud had the same size thread as a gas pipe of the same diameter.
Around the pancake box are four holes, each with a setscrew or clamp, which engages the cable, preventing it from being pulled out, and provides electrical continuity for the equipment ground for the armored cable.
The wiring is most likely type AC armored cable (BX). However, ungrounded non-metallic cable (The Type Before Romex) or knob and tube wiring are also possible. You can see the knob and tube wiring in the photo at the top of this page.
Check to see what the existing box and wiring consist of before you replace old ceiling pancake box.
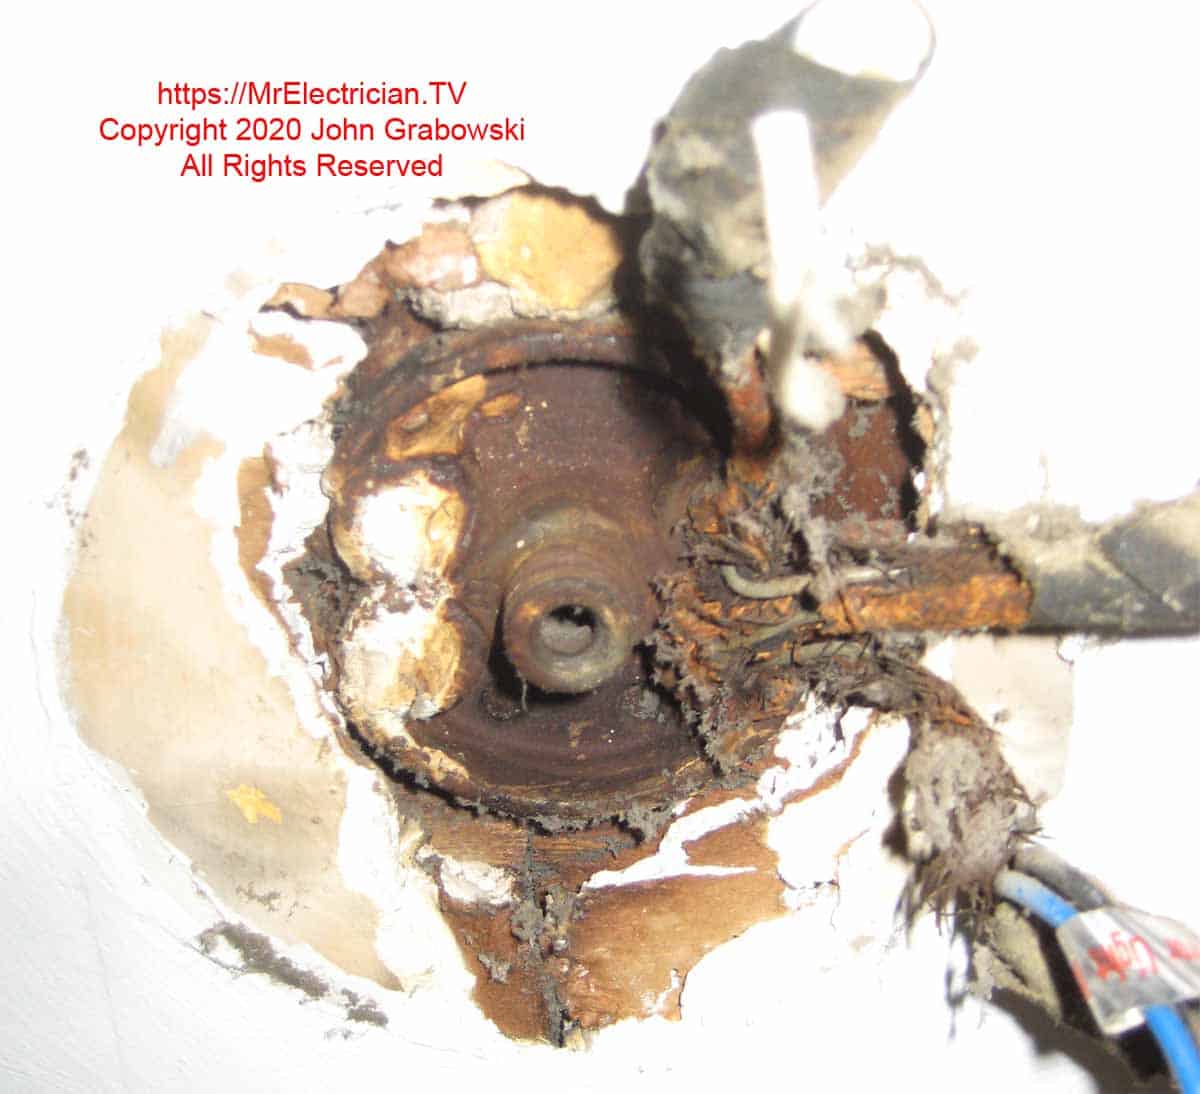
Beware if the gas pipe has a cap on it. Usually, the caps are removed when the gas line is taken out of service. However, you should not remove the cap until you can verify that the gas line is dead before you replace old ceiling pancake box.
If the original l wiring insulation has degraded, installing new wiring would be best. However, that could not only be expensive but damaging as well. Walls and ceilings may need to be cut open to re-route or remove old dried and brittle cables and install new wiring.
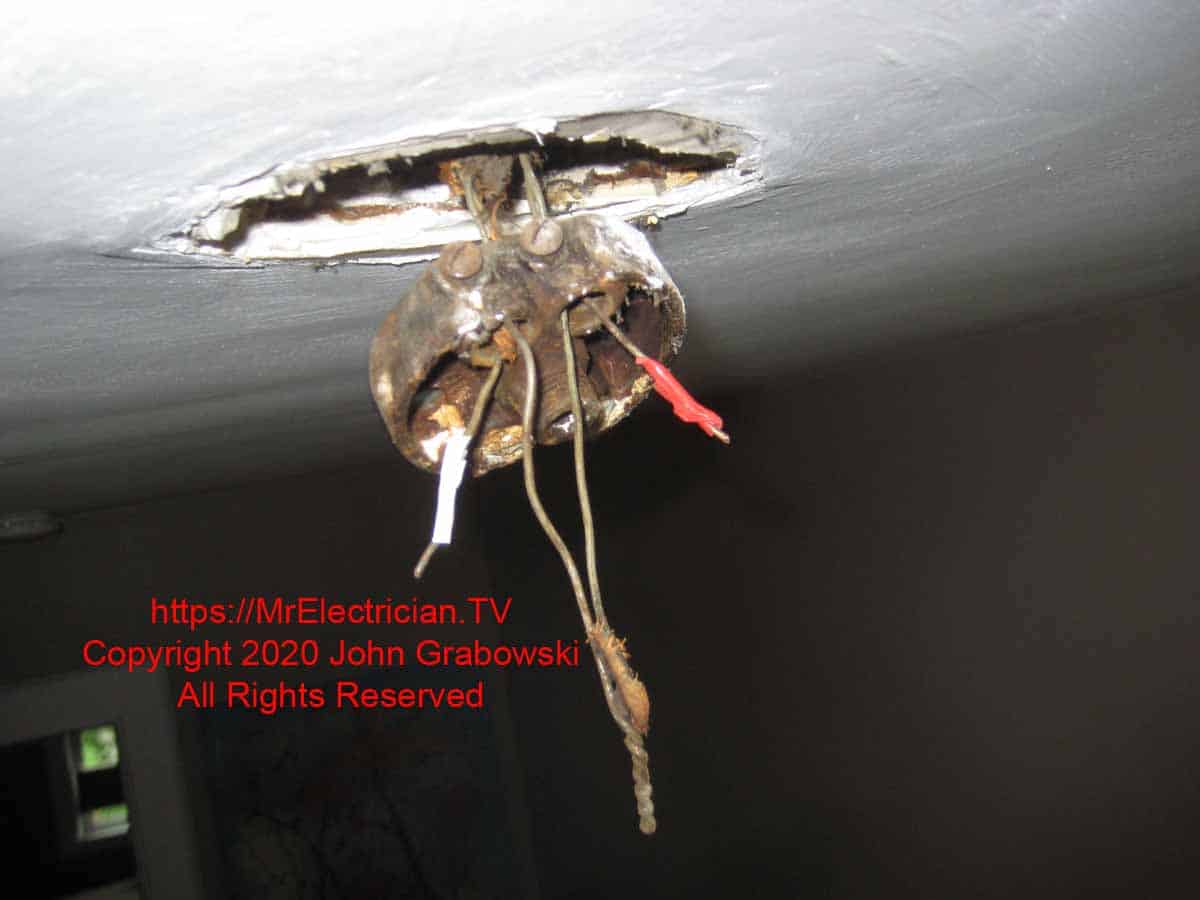
As you can see above, most of the old insulation broke off as I moved the wires. I identified the conductors with colored electrical tape. This was a normal wiring setup for a ceiling light controlled by a wall switch. The power entered the ceiling pancake box, and a two-wire cable was installed down to the switch. See my article on light switch wiring diagrams for more information before you replace old ceiling pancake box
REPLACEMENT OF OLD-STYLE PANCAKE BOX
Turn off the power. You will need to remove the old pancake junction box. Do it carefully so as not to damage the existing wiring. Often, wiring from that era of home construction now has dry, brittle insulation on it. Any disturbance to the wires could cause the insulation to break off.
Ensure you identify each conductor in the box before taking apart the splices. The color coding is almost gone on these wires. The wires are likely to be soldered and taped. The insulation on the wires will break off as you separate the conductors. Get a roll of white and a roll of black electrical tape. You may also need rolls of red and blue electrical tape.
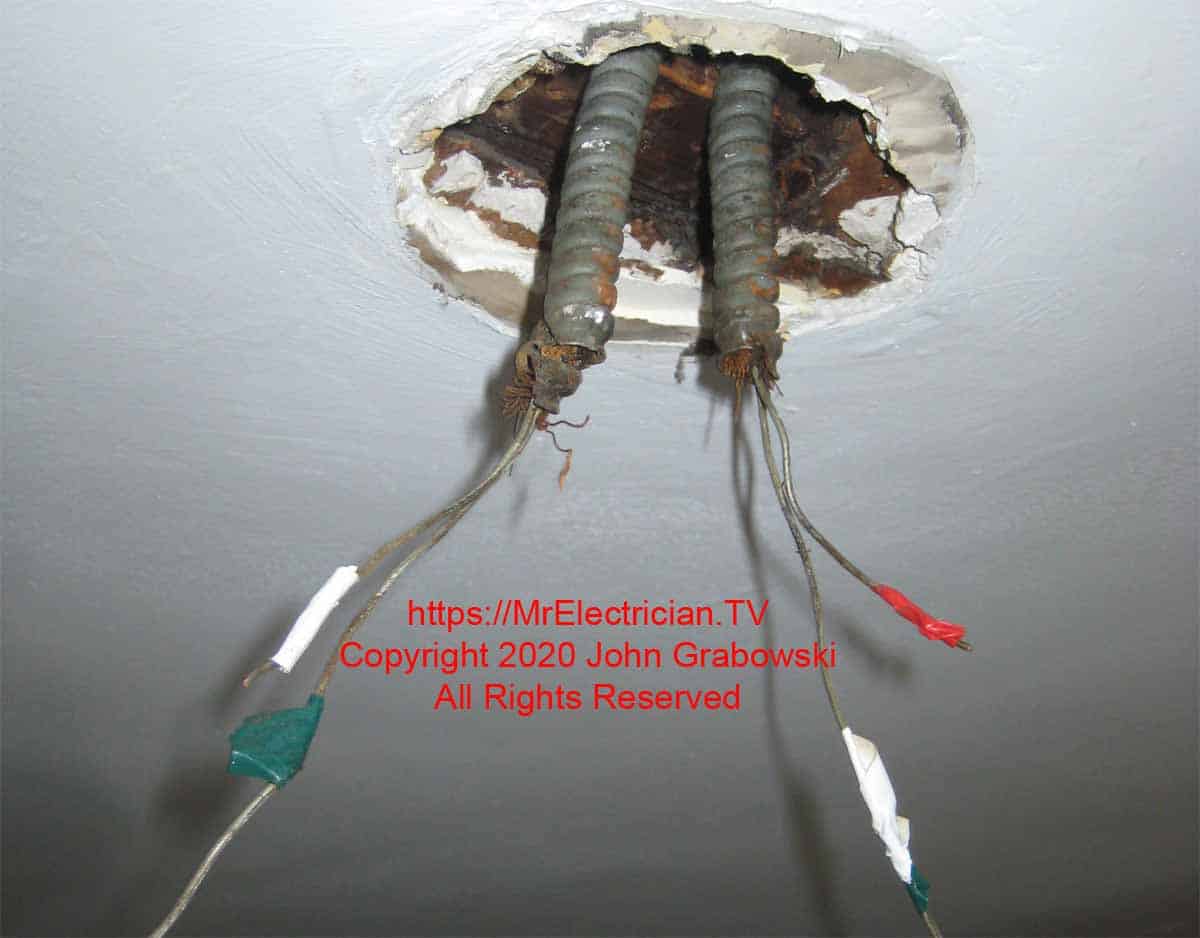
It doesn’t show it above, but I was able to strip about 2″ of steel armor off of each cable using BX cutting pliers. I held the cable with Channellock pliers and slowly nipped away at the steel armor using the BX cutters. That gave me enough room to find some good insulation to work back from with new electrical tape.
On some jobs, the gas pipe will hinder installing a new modern round or octagonal ceiling electrical box. Also, it is quite likely that a piece of wood supports the gas pipe, or the pipe may be attached to the side of a ceiling joist.
Sometimes a pipe wrench can be put on the gas pipe to unscrew it from the elbow. An internal pipe wrench might be needed. Other options are cutting it out with a multi-function oscillating tool or a reciprocating saw or relocating the ceiling box. Relocating may not be an option due to the lengths of the existing wires.
Once all obstacles have been removed and the existing cables have been identified and taped, a new electrical box can be installed. A new pancake box can be used, or an old work ceiling fan brace and box can be fitted through the existing hole. A side mount fan box is available if the joist is right there. Try to get the deeper round electrical boxes as they have more room for wires.
If you plan to install a ceiling fan, you must install an electrical box rated for ceiling fans when you replace old ceiling pancake box. Ceiling fan boxes are available in pancake depth.
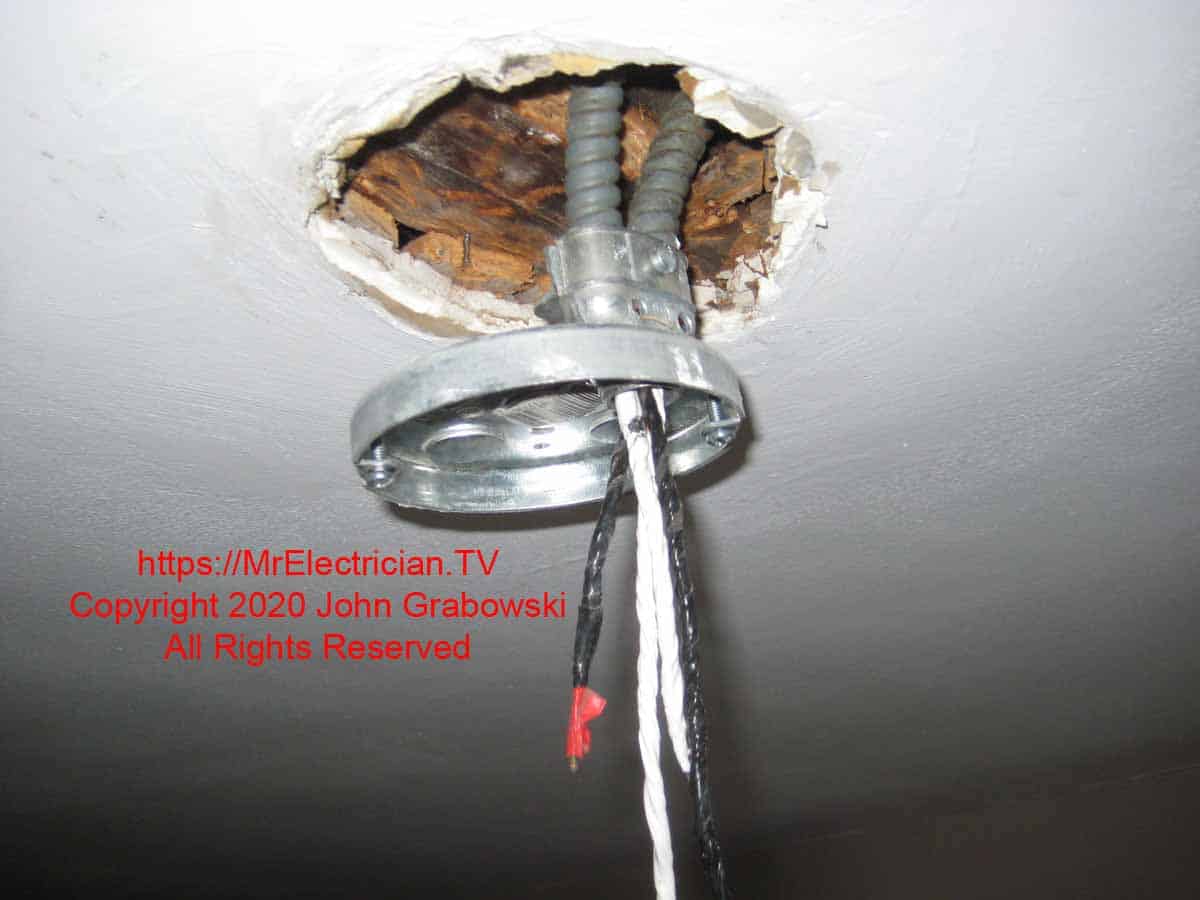
A duplex BX connector was used to attach the cables above to the pancake box. I had to clean up the opening in the ceiling with my multi-tool due to pieces of wood lath and plaster embedded with the old pancake.
Use the proper cable connectors and anti-short bushings to bring them into the back of the box. Trim the sharp edge of the BX cable using BX cutters or diagonal pliers. Then insert the anti-short bushing inside of the armor to protect the wire from being cut by the metal armor.
In this case, it may be best to put the cable connectors on the ends of the cables with the locknuts removed. Tape the ends of the wires together. Pull the cables through each connector as you push the box into the ceiling to replace old ceiling pancake box.
Tighten the locknuts by hitting them with a screwdriver driven by a hammer after the box is secured to the ceiling or bracket or use Channellock pliers or a locknut wrench. The BX cable metal armor is the grounding conductor, so it needs to be a tight connection.
A grounding pigtail was attached to the pancake box below using a 10/32 green grounding screw. The box is grounded from the BX cable’s metal armor, and the pigtail can be used to ground the new light fixture.
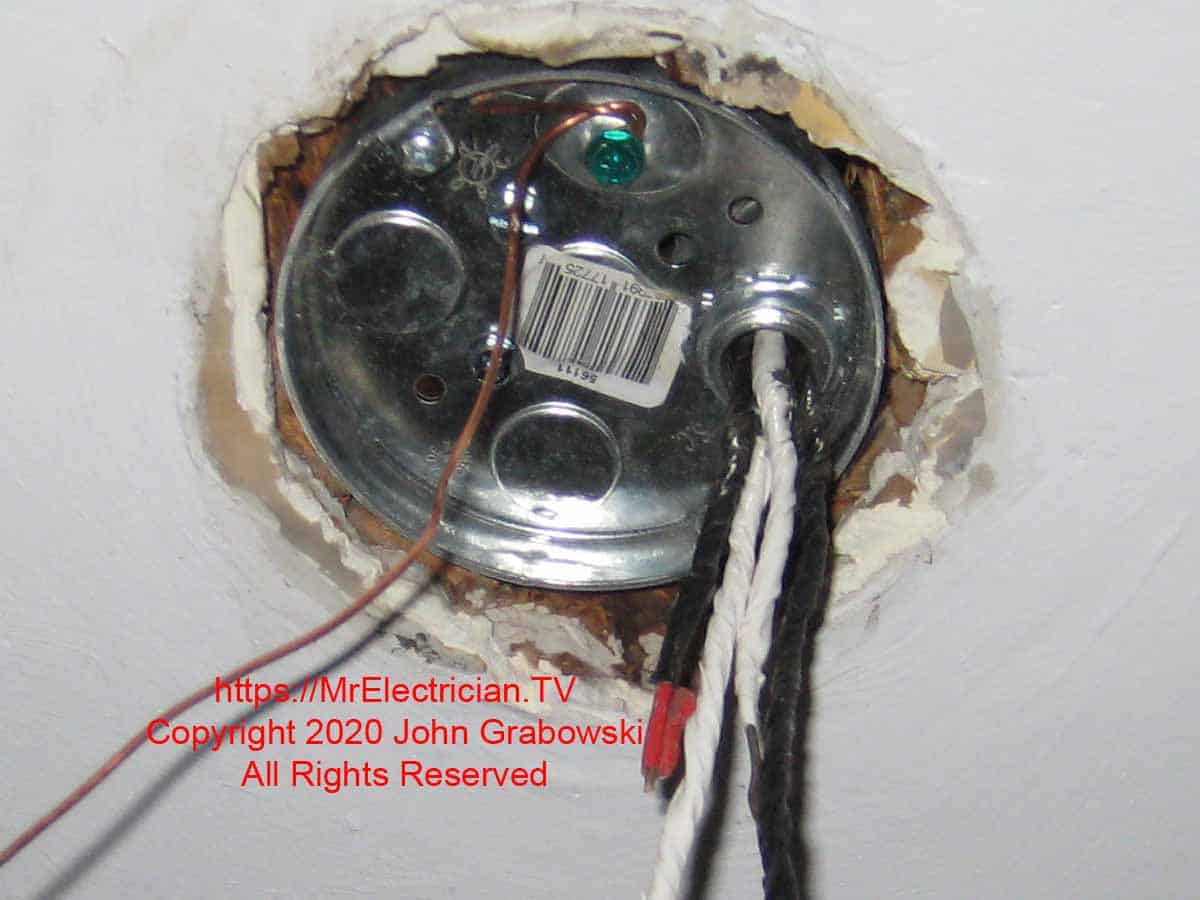
The box above is ready for a standard light fixture installation. Number 10 x 1.5″ sheet metal screws were used to secure the pancake box to the ceiling joist. The box is grounded by correctly using the cable connector and the BX armor. A grounding pigtail was added using number 14 copper wire. The wire with red is the switch leg (LOAD) which gets connected to the black wire on the light fixture.
The white wire with green (The LINE to the switch) was partially covered in black tape before connecting to the black hot wire with green (LINE). When a white wire is used for something other than a neutral, it must be re-identified. I use colored electrical tape. Some other electricians use a permanent marker pen to change the wire color.
The other white wire (Neutral) connects directly to the light fixture’s white wire. The green tape was only used to identify the wires as I worked on this repair.
The green tape was removed before I made the final connections to the light fixture. Green is only to be used for identifying a grounding wire. With BX cable, the metal armor is the grounding conductor.
In the above box, two knockouts have not been punched out.
OLD CEILING PANCAKE BOXES FROM VISITORS
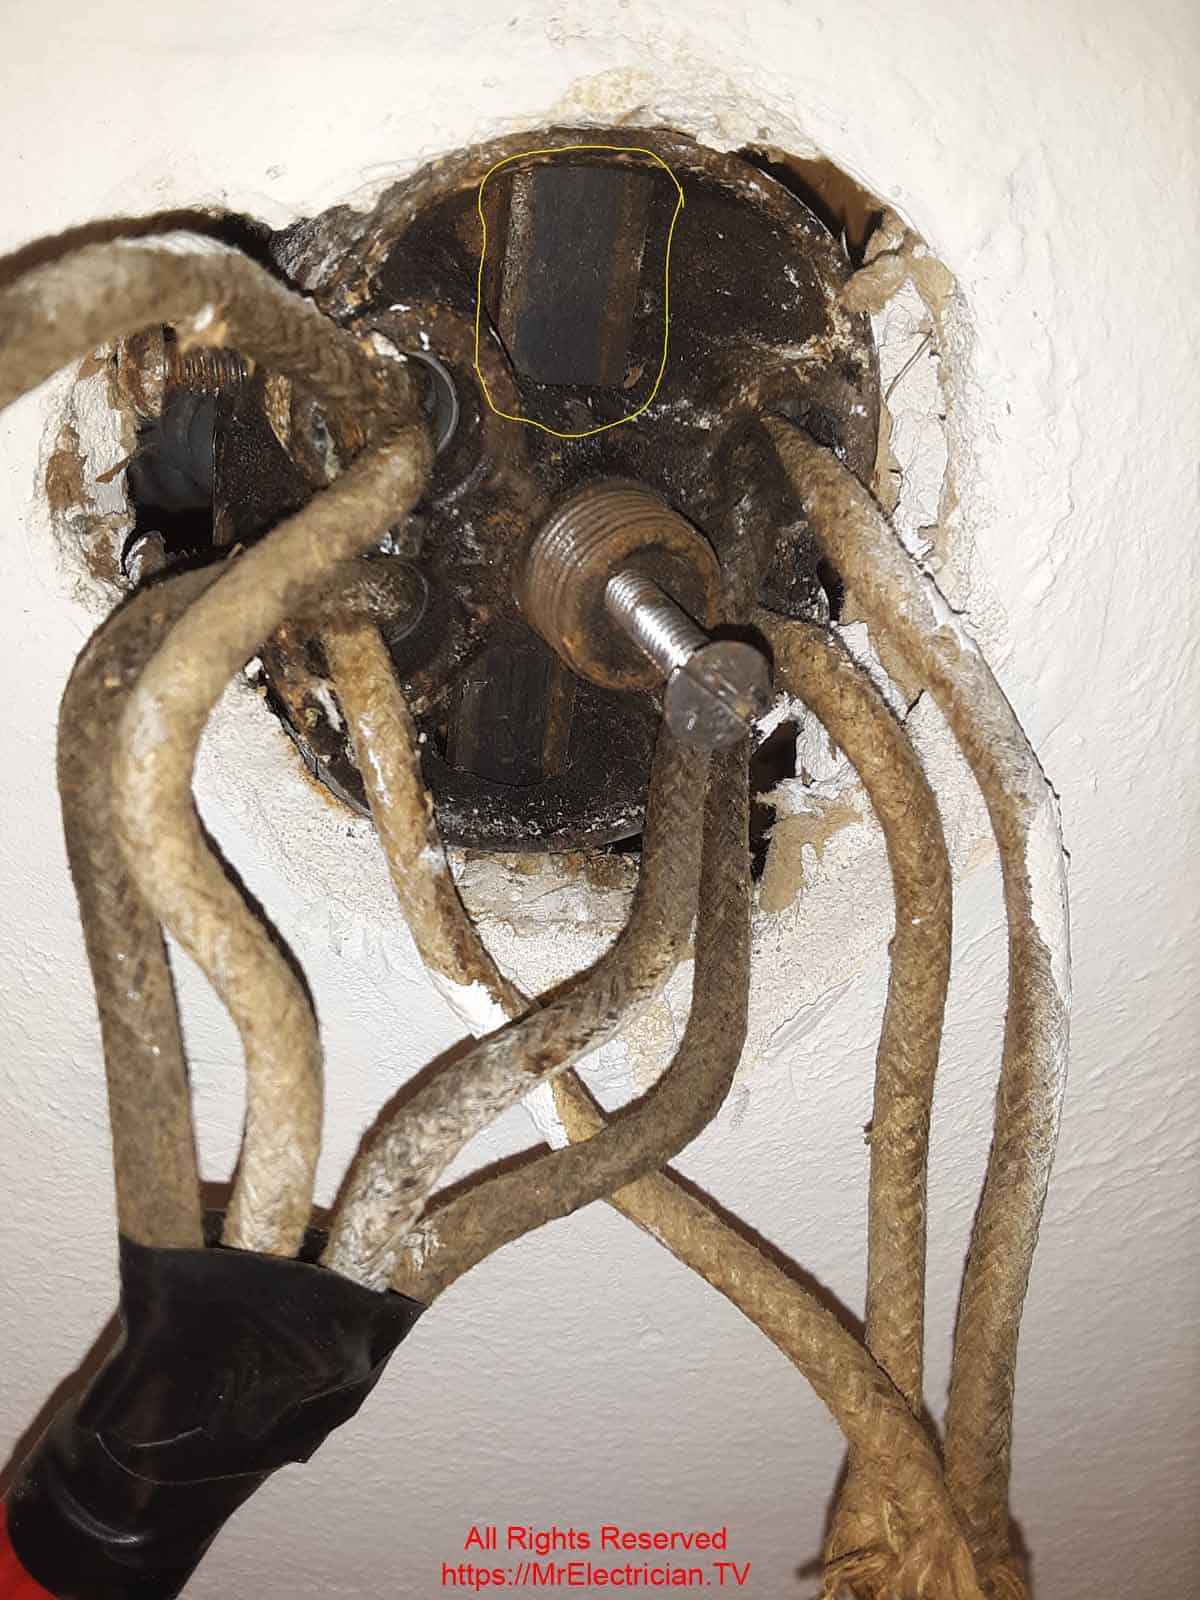
A visitor to my blog sent me the above photo of a pancake box with live electrical wires still in use. The house is from 1930. His dilemma was how to remove the box. There are no screw holes in the back of the box, but a metal bar passes through (See yellow circle).
I surmised that the metal bar is a support bracket either attached directly between two ceiling joists or screwed to wood lath. The box is held firmly onto the bracket by the center screw. If that is the case, some plaster would need to be removed to remove the bracket.
I suggested possibly cutting the bracket with an oscillating multi-tool so that an old work fan box and brace could be installed. However, with a house that old, it is quite possible that the plaster would be damaged during the cutting process.
The insulation on the wires is in good condition, but I recommended taping each wire with appropriately colored electrical tape to keep the insulation intact. White tape on the three neutral conductors. Black tape on the four hot wires. Red tape on the switch leg.
The cable in the upper left section of the pancake box is the one that goes down to the wall switch. The white wire from this cable is connected to the three black hot conductors. The black wire which brings the power back from the switch is by itself. These wires should also be re-identified at the switch with red and black electrical tape.
A white wire can be used as a hot conductor, but its color must be changed to something other than white, gray, or green. Electrical tape or a permanent ink marker are two common methods for changing the color of wires. Unfortunately, the re-identification of the white wire does not always occur, as evidenced in the above picture.
Another visitor to MrElectrician.TV sent me the photo below of what he found when he lowered the canopy cover on an existing light fixture in his 1906 home.
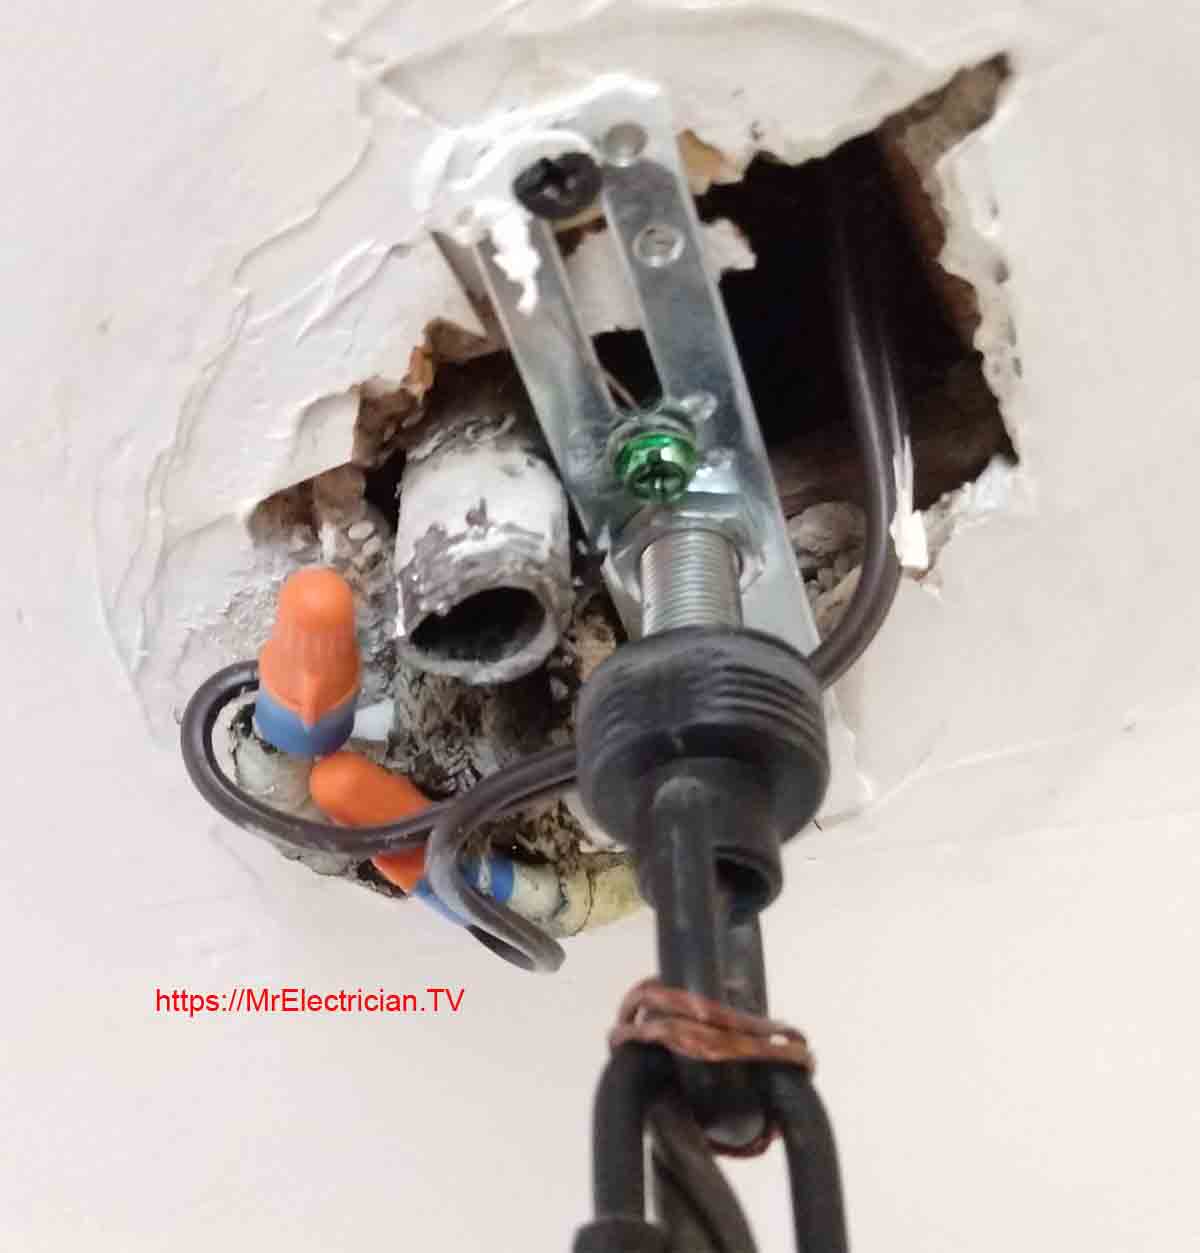
The house from the above photo was originally piped for gas lighting. At some point in its history, electrical wiring was installed. Normally in a gas-to-electricity retrofit, a pancake electrical box would slide over the gas pipe, and a set screw would lock it in place. The new BX wiring would have terminated in the pancake box.
The ceiling light fixtures from that era were mounted differently than today’s to accommodate the gas pipes. I surmise that someone wanted a new modern light fixture at some point and found it would not mount onto the old pancake box or gas pipe. So the pancake box was removed, and the bracket that typically mounts on an electrical box was screwed directly to the ceiling.
This is the wrong way. The wires are not protected in an electrical box, and the BX armor’s grounding continuity is lost.
I suggested that the homeowner install an adjustable ceiling fan brace and box that would retrofit the inside of the existing hole in the ceiling. However, the problem is that the old gas pipe protrudes from the ceiling. It appears that someone already tried to remove it without much success.
I have been in this situation myself and can attest that unscrewing the pipe from its base can be almost impossible. In those instances, I had to use a reciprocating saw to cut it out. The saw works well with the correct blade in cutting out the pipe, but it can also damage the ceiling.
Another visitor to MrElectrician.TV sent me the below photo with a question: “I am replacing an old chandelier in the living room of my pre-1915 apartment. After removing the old light fixture, I discovered it was hanging from a hickey attached to a threaded pipe in the center of the non-load-bearing pancake box. The ceilings are concrete.
My question is whether it is safe to hang the new fixture from the center pipe using a hickey or whether it would be necessary to bring in an electrician to replace the box with a newer one designed to support the weight of the new fixture using a strap.
The old fixture weighed 26 lbs, and the new one will weigh 55 lbs.”
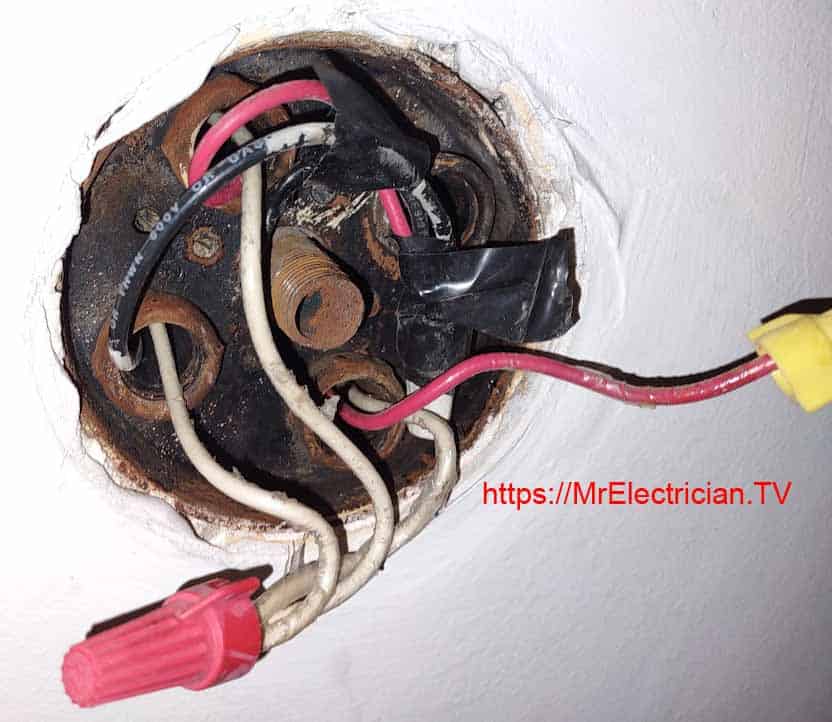
My response: “I don’t think I can give you a definite answer, but I can share my thoughts.
Given that there are electrical conduits with wires in that electrical box, I don’t think there was gas lighting there originally. Normally a retrofitted gas pipe would have cables fished over to the gas pipe, and a box with a set screw or locknut would be installed over the pipe.
That protruding pipe is either part of the electrical box or was added as an accessory during the original installation for the light fixture hanging.
Since the entire conduit and box assembly is embedded in concrete, replacing the box will be challenging and require repair to the ceiling.
I would try pulling on the pipe using your body weight to get a feel of the strength of the pipe. I guess that it is pretty solid.
Depending on the type of bracket that is furnished with the new light fixture, you may be able to provide additional support by screwing the bracket directly to the concrete using 1/4″ plastic anchors with #12 sheet metal screws, in addition to using the pipe as support. I am assuming that the concrete is in good solid condition.
If the hickey is too big for the new light fixture canopy, you can use locknuts on the pipe, though they can be difficult to find locally.”
“In 1915, the standard mount for a ceiling light fixture was with a pipe and hickey. No screw-hole tabs on electrical ceiling boxes were available then. I don’t know exactly when the change occurred, but I am guessing it occurred before WW2 based on another old wiring I have seen.
Also, back then, the ceiling boxes were shallow and did not have allowances for the number of wires because the light fixture canopy had a lot of room. The electrical code still allows the cubic inch capacity of the canopy to be included when calculating box fill.
The original wires that were installed in the conduit were cloth-covered. Having the conduits in place made it very easy to replace the old wires with the plastic-insulated ones you have now from when the apartment was renovated.
Many years ago, I had to replace cloth-covered wires in conduit installed around the same time as yours. When I pulled the old wires out, the insulation came off inside the RMC conduit. I had to repeatedly push a steel fish tape in and pull out pieces of insulation before I was able to pull new wires in.
The conduits are most likely helping to support the box, given that you can push up on the center pipe but cannot pull it down.
You could try drilling and tapping two holes in the back of the box and use longer screws to attach the light fixture. However, with the weight of the new light fixture, I would use bigger screws than the standard 8/32.
Under normal conditions, I would replace a standard ceiling box with a fan-rated ceiling box to support a light fixture that weighed over 50 pounds.”
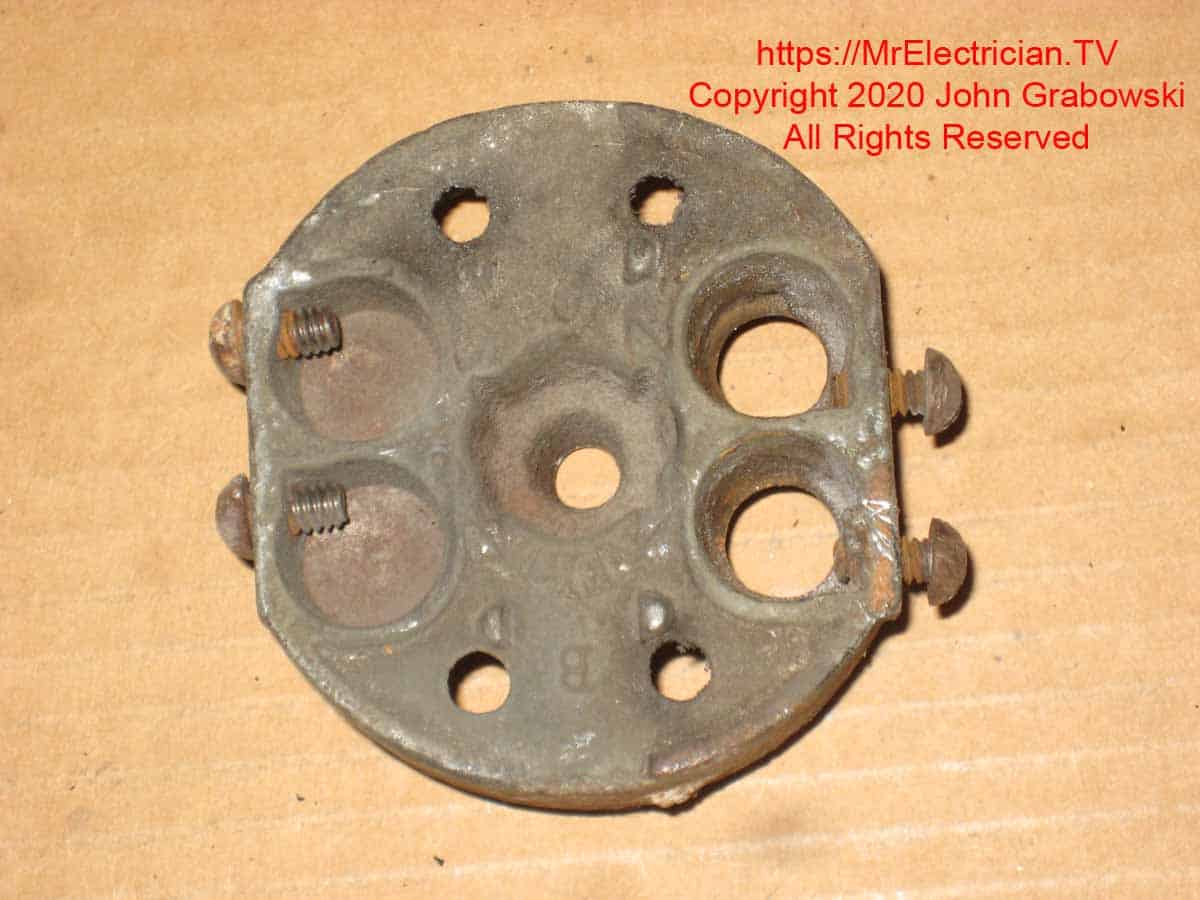
I received the following photos from a website visitor asking if I knew what they were in the photos. He removed them when replacing wall sconce lighting fixtures in his 1910 house.
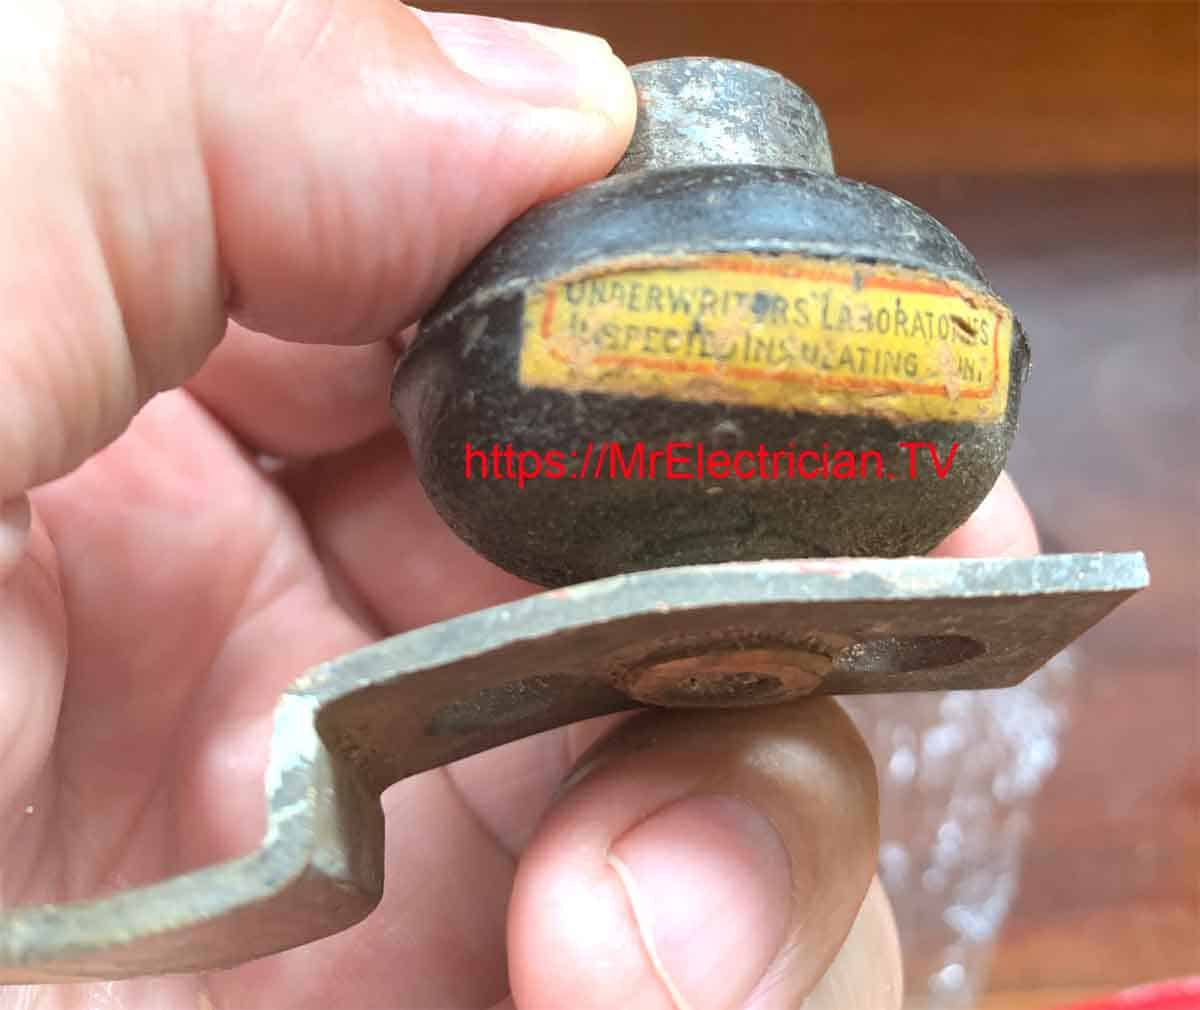
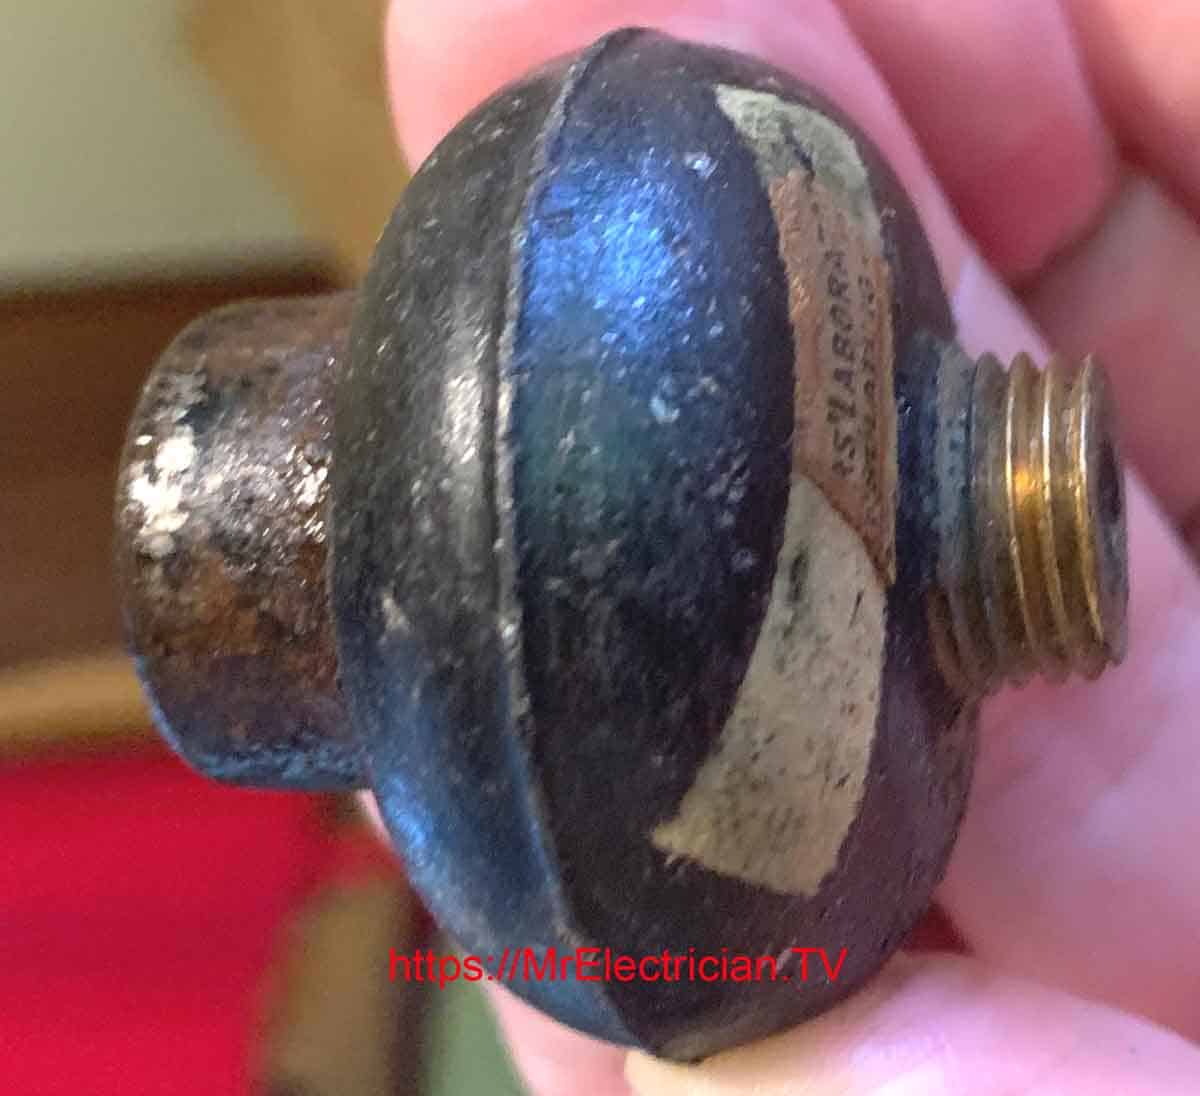
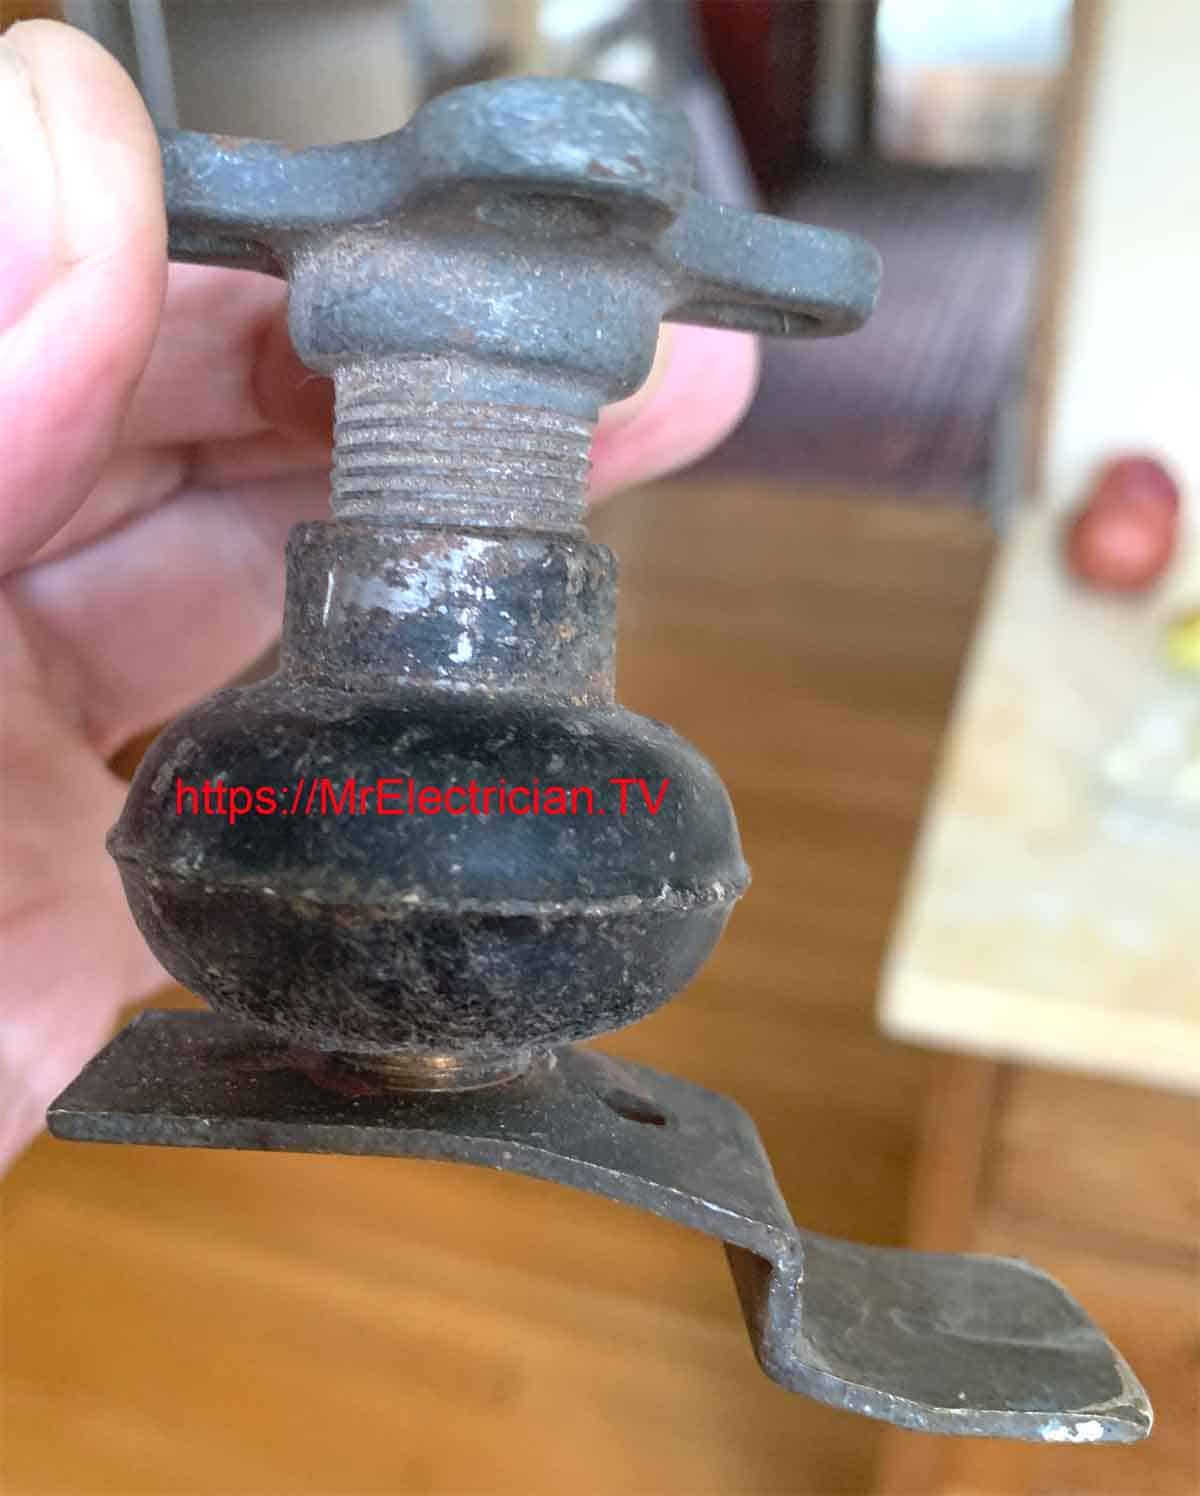
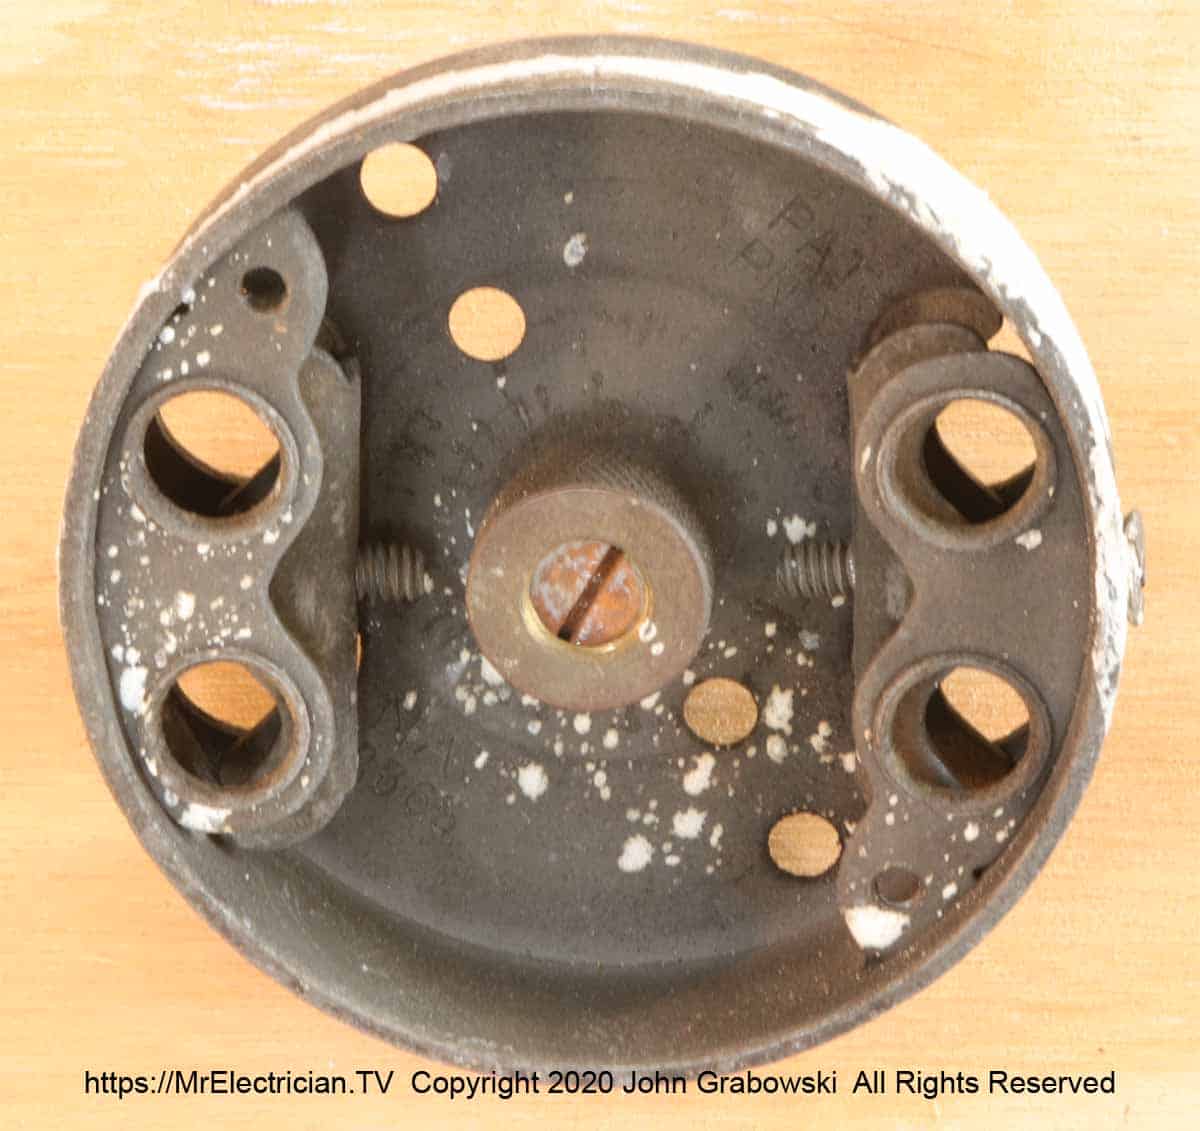
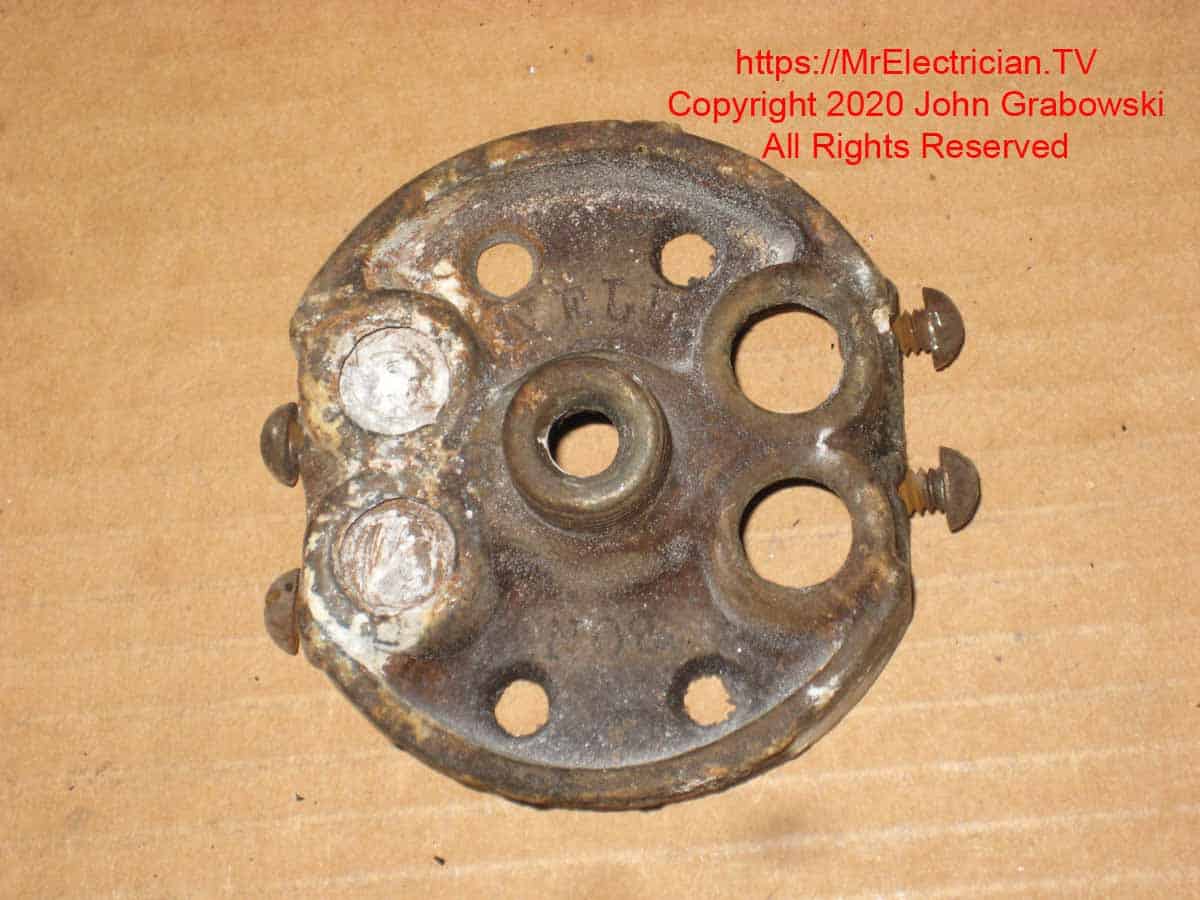
Above is the front of a very old-style pancake electric box. A brass screw-on cap is on the center stud of the above pancake box. I forget how it was used, but I think it had to do with hanging light fixtures. The center hole is threaded for 1/8″ NPS.
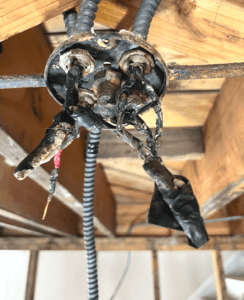
I got the above photo from 4B Systems, the Illinois electrical contractor working on this home.
You can follow 4B Systems on Instagram.
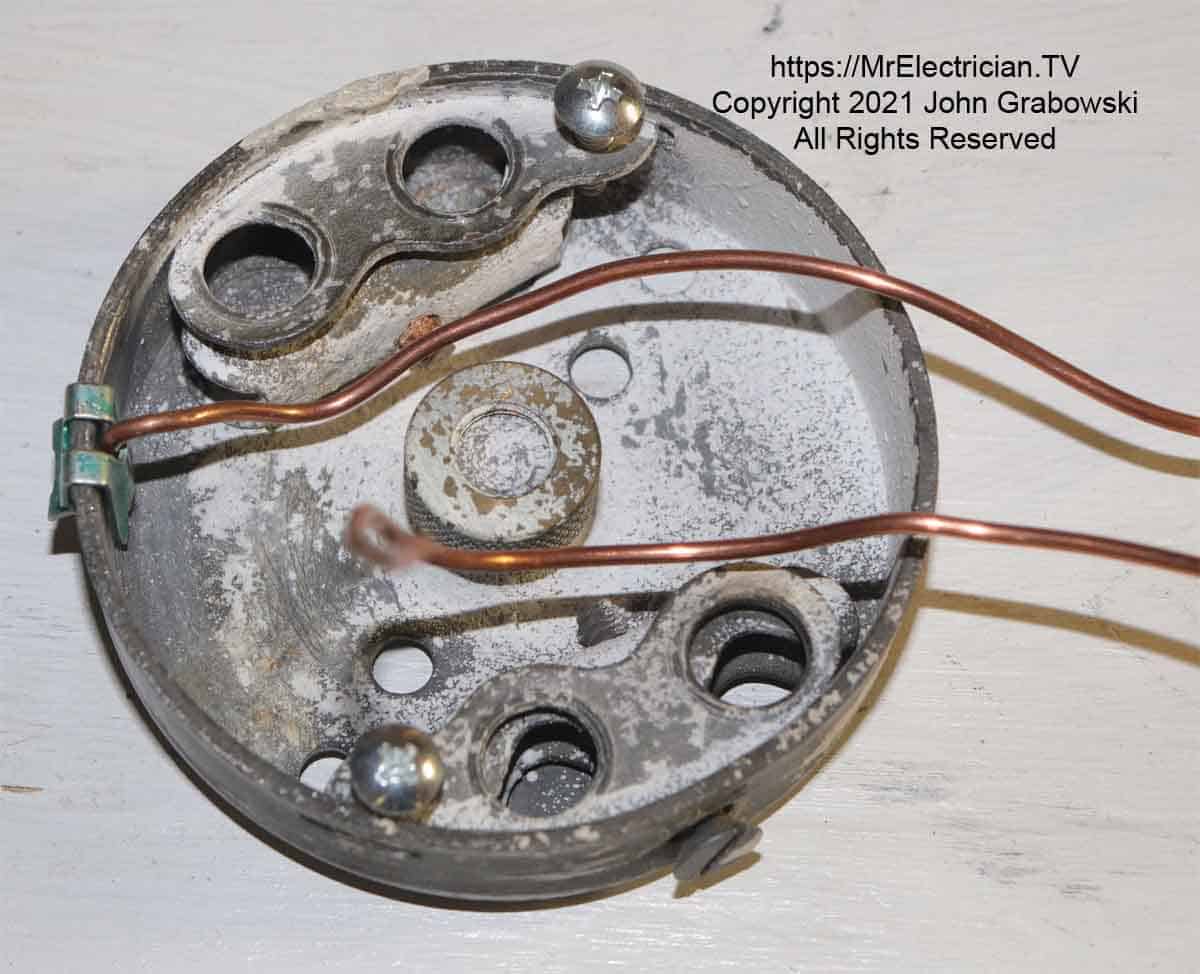
A grounding pigtail wire is easily attached to the side of a grounded metal electrical box using a ground clip. That grounding pigtail can ground a light fixture or wiring device. The above pancake box would need to have a BX cable connected to it to be grounded. This box is not made for Romex.
See my post with light switch wiring diagrams for more information on switch wiring.
The National Electrical Code accepts the use of pancake ceiling boxes even though they do not have a lot of cubic inch capacity. They are permitted because the code allows the identified cubic inch capacity of the light fixture canopy to be included in the total calculation of box fill. See article 314.16(A).
Generally speaking, for each #14 wire, two cubic inches are required. For #12 wire, it is 2.25 cubic inches. Each internal wire clamp counts as one wire. Read article 314.16 for all of the details before you replace old ceiling pancake box

My blog post on repairing a loose ceiling electrical box may be helpful.
Also, my post on installing a ceiling fan electrical box is good to read.
The National Electrical Code requires a whole house surge protector. Read my article here about buying the best surge protector for your home.
Visit my Link Tree for links to my social media sites, more electrical information, and merchandise from Mr. Electrician.
